AWS Outposts is a fully managed service that extends AWS infrastructure, services, APIs, and tools to customer premises. By providing local access to AWS-managed infrastructure, AWS Outposts enables customers to build and run workloads on-premises using the same application programming interfaces (APIs) as in AWS Regions, while leveraging local compute and storage resources to deliver lower latency and support local data processing.
This article covers an example of how customers can deploy workloads on AWS Outposts servers while integrating with NetApp iSCSI storage for on-premises data. While we present an example for Outposts servers, many of the same concepts apply to Outposts' rack deployments. Please note that management of external storage, including its high availability and security posture, is the customer's responsibility.
This article assumes you are familiar with AWS Outposts, including local network interface (LNI) functionality for Outposts servers. If you would like to get more familiar with AWS Outposts, the user guide, What is AWS Outposts, is a great place to start.
Prerequisites
AWS Infrastructure Requirements
For AWS Outposts server:
- Operational AWS Outposts server deployment
- Local network connectivity between the Outposts server and the storage array
- Use of LNI (local network interface) for connectivity
- IAM roles and permissions for EC2 and network management
- Sufficient Outpost capacity for planned workloads
Storage Requirements
- Storage system with ONTAP 9.8 or later (for NetApp deployments)
- Network connectivity to AWS Outposts rack/server
- Available storage capacity
- Administrative access to the storage system
- iSCSI license enabled on the storage system
Network Requirements
- Minimum 10Gbps network connectivity
- Low-latency connection (<2ms) between Outposts and storage array
Architecture Overview
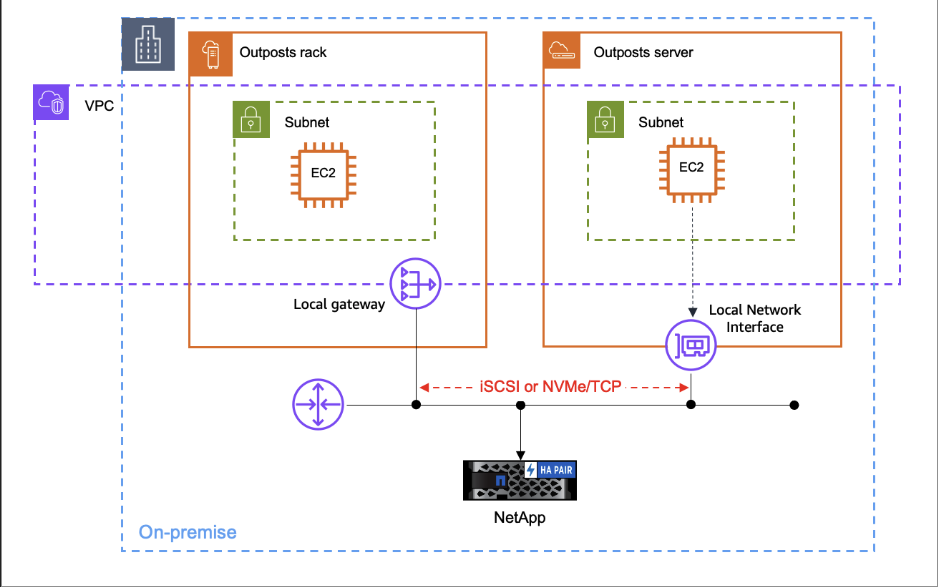
The integration connects EC2 instances running on AWS Outposts to storage arrays using iSCSI over your local network. This allows you to:
- Utilize existing storage infrastructure with AWS Outposts workloads
- Maintain data locality requirements while leveraging cloud capabilities
- Use enterprise storage features like snapshots and replication
- Achieve consistent performance for storage-intensive applications
Design Principles
The external storage integration with AWS Outposts follows these key design principles:
- Data locality compliance: Keeps information within specified boundaries while using cloud benefits
- High availability architecture: Reduces downtime with redundant components and failover mechanisms
- Performance optimization: Ensures consistent, low-latency operations
- Security by design: Protects data at every layer, from network segmentation to authentication
- Scalable infrastructure: Starts with current needs and supports growth over time
Deployment scenario: Outposts server with NetApp iSCSI block storage
The Internet Small Computer System Interface (iSCSI) is a protocol used in Storage Area Networks (SANs) to share block-level storage resources over a network. Employing a client-server architecture, iSCSI facilitates the transmission of SCSI commands between two primary components: the initiator and the target. The iSCSI Target is a service hosted on an iSCSI server that grants access to shared storage. Conversely, the iSCSI Initiator functions as the client, establishing a connection to the target to access shared storage resources.
Goal
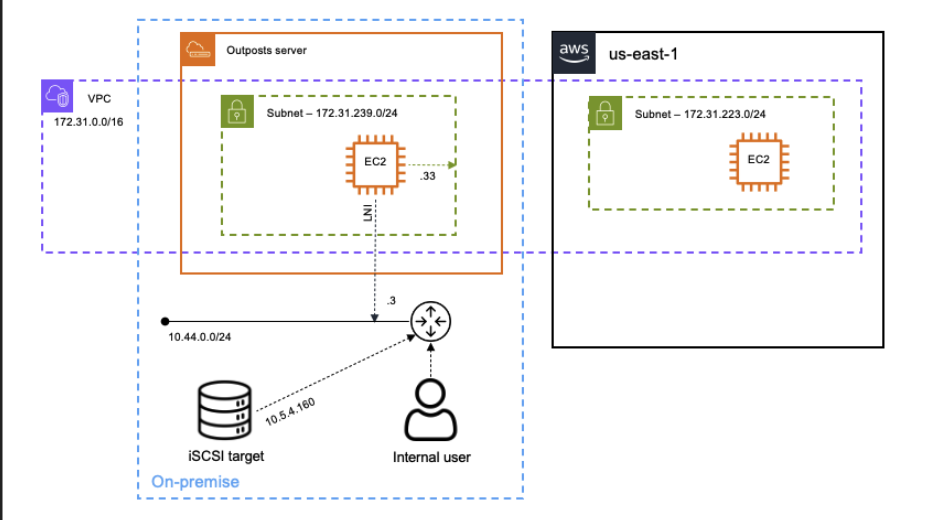
Customer has an application that requires block storage served by an on-premises SAN appliance.
Assumptions:
- A resilient SAN appliance (iSCSI Target) is already configured with an iSCSI LUN (Logical Unit Number).
- The EC2 instance on the Outposts server acts as the iSCSI initiator.
- For regulatory reasons, the application must remain local, and access to the application is only through the LAN.
NetApp Storage Configuration for iSCSI
If you're using NetApp storage, follow these steps to configure your storage system:
- Configure Storage Virtual Machine (SVM)
vserver create -vserver iscsi_svm \
-rootvolume iscsi_root \
-rootvolume-security-style unix \
-language C.UTF-8 \
-ipspace Default
- Create and configure volumes
volume create -vserver iscsi_svm \
-volume vol_iscsi \
-aggregate aggr1 \
-size 1TB \
-state online \
-policy default \
-unix-permissions ---rwxr-xr-x \
-type RW
iscsi create -vserver iscsi_svm
iscsi start -vserver iscsi_svm
lun create -vserver iscsi_svm \
-volume vol_iscsi \
-lun lun1 \
-size 100GB \
-ostype linux \
-space-reserve disabled
- Create iSCSI LIF (Logical InterFace)
network interface create -vserver iscsi_svm \
-lif iscsi_lif \
-role data \
-data-protocol iscsi \
-home-node node1 \
-home-port e0c \
-address 10.5.4.160 \
-netmask 255.255.255.0
igroup create -vserver iscsi_svm \
-igroup ig_linux \
-protocol iscsi \
-ostype linux \
-initiator iqn.2024-02.com.example:instance-i-01234567890abcdef
lun mapping create -vserver iscsi_svm \
-path /vol/vol_iscsi/lun1 \
-igroup ig_linux \
-lun-id 0
Configuration process
Create the user-data script
The user-data script is used to pass along commands to the EC2 instance at the time of first launch.
iscsi_client.txt
#!/bin/bash
# Define variables for configuration
ISCSI_TARGET=10.5.4.160
MY_LOCAL_IP=10.44.0.20

# Disable cloud-init network configuration to prevent overwriting our settings
echo 'network: {config: disabled}' > /etc/cloud/cloud.cfg.d/99-disable-network-config.cfg

# Configure ENI (ens5) without default route to VPC
# Add specific route to VPC subnet via the ENI gateway
sed -i -e "/ens5/,/ens5/ s/route-metric: 100/use-routes: false\n routes:\n - to: 172.31.223.0\/24\n via: 172.31.239.1/" /etc/netplan/50-cloud-init.yaml

# Configure LNI (ens6) with static IP address
# Set default route to on-premises network and add route to iSCSI storage
sed -i -e "/ens6/,/ens6/ s/dhcp4: true/dhcp4: false\n addresses:\n - $MY_LOCAL_IP\/24\n nameservers:\n addresses: [8.8.8.8, 8.8.4.4]\n routes:\n - to: default\n via: 10.44.0.1\n - to: 10.5.4.0\/24\n via: 10.44.0.1/" /etc/netplan/50-cloud-init.yaml

# Apply network configuration changes
netplan apply

# Update package lists and install iSCSI initiator
apt update -y
apt install open-iscsi -y

# Enable CHAP authentication in iSCSI configuration
# Note: In a production environment, set actual username and password values
sed -i -e "s/#node.session.auth.authmethod/node.session.auth.authmethod/" /etc/iscsi/iscsid.conf
sed -i -e "s/#node.session.auth.username =/node.session.auth.username =/" /etc/iscsi/iscsid.conf
sed -i -e "s/#node.session.auth.password =/node.session.auth.password =/" /etc/iscsi/iscsid.conf

# Restart iSCSI services to apply changes
systemctl restart open-iscsi iscsid

# Discover available iSCSI targets
iscsiadm -m discovery -t sendtargets -p $ISCSI_TARGET

# Login to iSCSI target
iscsiadm -m node --login -p $ISCSI_TARGET

# Configure iSCSI connection to persist across reboots
iscsiadm -m node -p $ISCSI_TARGET -o update -n node.startup -v automatic The script configures an EC2 instance to connect to an external iSCSI storage system.
Script Breakdown | Details |
Network configuration | Define the iSCSI target IP address and assign a static IP to the instance |
Network setup | Disable cloud-init's network management to prevent overwrites, configure the ENI for VPC connectivity, set a static IP on the LNI, and apply changes |
iSCSI initiator setup | Update the system, install open-iscsi, enable CHAP authentication, and restart services |
iSCSI target connection | Discover targets on the iSCSI server, login to establish a connection, and configure it to auto-reestablish after reboots |
Launch an EC2 instance on the Outposts server
Now that we have created the user-data script, we can use it to initialize our EC2 instance. Our command to launch an instance like this:
aws ec2 run-instances \
--image-id ami-080e1f13689e07408 \
--count 1 \
--instance-type c6id.xlarge \
--key-name mykey \
--user-data file://iscsi_client.txt \
--network-interfaces '[ \
{ "DeviceIndex":0, "SubnetId":"subnet-0ca6abe6b34adfcce", "Groups": ["sg-0a9f8c2200c0a56f1"] }, \
{ "DeviceIndex":1, "SubnetId":"subnet-0ca6abe6b34adfcce", "Groups": ["sg-0a9f8c2200c0a56f1"] }]' \
--tag-specifications '[{ "ResourceType":"instance","Tags":[{ "Key":"Name", "Value":"iscsi-client1" }] }]' Let's break down the parameters:
Parameter | Description |
--image-id ami-080e1f13689e07408 | Specifies the Amazon machine image (AMI) ID for Ubuntu 22.04 from us-east-1 |
--count 1 | Specifies how many EC2 instances to launch |
--instance-type c6id.xlarge | Specifies the instance type. Default: Outposts 2U servers with c6id.8xlarge, Outposts 1U servers with c6gd.8xlarge. Modify in the AWS console |
--key-name mykey | Specifies the public RSA key to be added to your EC2 instance |
--user-data file://iscsi_client.txt | Specifies the filename that contains your user-data script |
--network-interfaces '[ { "DeviceIndex":0, "SubnetId":"subnet-0ca6abe6b34adfcce", "Groups": ["sg-0a9f8c2200c0a56f1"] }, { "DeviceIndex":1, "SubnetId":"subnet-0ca6abe6b34adfcce", "Groups": ["sg-0a9f8c2200c0a56f1"] }]' | Specifies the network interface configuration. DeviceIndex:0 for the ENI, DeviceIndex:1 for the LNI |
--tag-specifications '[{ "ResourceType":"instance","Tags":[{ "Key":"Name", "Value":"iscsi-client1" }] }]' | Assigns a name to the EC2 instance |
Verify iSCSI block volume
After launching the instance and executing the user-data script, you can verify that the iSCSI block volume is attached:
ubuntu@ip-172-31-239-206:~$ sudo iscsiadm -m session -o show

tcp: [1] 10.5.4.160:3260,1 iqn.2024-01.example.com:lun1 (non-flash)


ubuntu@ip-172-31-239-206:~$ lsblk
NAME    MAJ:MIN RM  SIZE RO TYPE MOUNTPOINTS
loop0     7:0    0 24.9M  1 loop /snap/amazon-ssm-agent/7628
loop1     7:1    0 63.9M  1 loop /snap/core20/2182
loop2     7:2    0 55.7M  1 loop /snap/core18/2812
loop3     7:3    0   87M  1 loop /snap/lxd/27037
loop4     7:4    0 40.4M  1 loop /snap/snapd/20671
sda       8:0    0   20G  0 disk
└─sda1    8:1    0   20G  0 part
nvme0n1 259:0    0 220.7G  0 disk
├─nvme0n1p1 259:1 0 220.6G  0 part /
├─nvme0n1p14 259:2 0    4M  0 part
└─nvme0n1p15 259:3 0  106M  0 part /boot/efi
In the output above, sda is the block device that appears as a separate 20G disk.
Format and mount the iSCSI volume
To make the iSCSI volume usable, format it and create a mount point:
sudo mkfs.xfs /dev/sda
sudo mkdir -p /mnt/iscsi
sudo mount /dev/sda /mnt/iscsi
To make the mount persistent across reboots, add an entry to /etc/fstab:
echo '/dev/sda /mnt/iscsi xfs _netdev 0 0' | sudo tee -a /etc/fstab
Considerations for Outposts rack
Since EC2 instances on Outposts racks have a single network interface, the configuration process is simpler. There is no need to make OS-level network changes in the user-data script to adjust for your LAN. Instead, the EC2 instance uses the local gateway (LGW) to connect to the NetApp storage appliance. Only the iSCSI initiator and volume settings are required.
Security Considerations – Optional but recommended
Authentication
To ensure secure connections between AWS Outposts instances and storage systems, implement the Challenge Handshake Authentication Protocol (CHAP), which provides password-based authentication at the connection layer. Configure unique initiator names for each server or application to access the storage, enabling precise identification and access control. Implement regular credential rotation practices to minimize risk.
For enhanced security, consider using AWS Secrets Manager to store CHAP passwords:
# Store CHAP credentials in AWS Secrets Manager
aws secretsmanager create-secret \
    --name "iscsi-chap-credentials" \
    --description "CHAP credentials for iSCSI connection" \
    --secret-string '{"username":"chap-user","password":"chap-password"}'

# Retrieve CHAP credentials in user-data script
CHAP_CREDS=$(aws secretsmanager get-secret-value --secret-id iscsi-chap-credentials --query SecretString --output text)
CHAP_USER=$(echo $CHAP_CREDS | jq -r .username)
CHAP_PASS=$(echo $CHAP_CREDS | jq -r .password)

# Configure CHAP in iscsid.conf
sed -i -e "s/node.session.auth.username =/node.session.auth.username = $CHAP_USER/" /etc/iscsi/iscsid.conf
sed -i -e "s/node.session.auth.password =/node.session.auth.password = $CHAP_PASS/" /etc/iscsi/iscsid.conf Network Security - Optional but recommended
The network architecture supporting the iSCSI integration requires multiple layers of security:
- Network segmentation: Logically isolate storage traffic from other network functions
- Dedicated VLANs: Establish VLANs exclusively for iSCSI traffic
- Network monitoring: Monitor network activity to establish baselines and detect anomalies
- Security groups: Configure security groups to allow only necessary traffic (port 3260 for iSCSI)
# Example security group configuration for iSCSI
aws ec2 create-security-group \
    --group-name iSCSI-SG \
    --description "Security group for iSCSI traffic" \
    --vpc-id vpc-1234567890abcdef

aws ec2 authorize-security-group-ingress \
    --group-id sg-0a9f8c2200c0a56f1 \
    --protocol tcp \
    --port 3260 \
--source-prefix-list-id pl-1234567890abcdef Performance Management
For NetApp storage systems, you can configure Quality of Service (QoS) policies to ensure consistent performance:
# Create QoS policy
qos policy-group create -policy-group pg_iscsi \
-vserver iscsi_svm \
-max-throughput 500MB/s

# Apply QoS to LUNs
lun modify -vserver iscsi_svm \
-volume vol_iscsi \
-lun lun1 \
-qos-policy-group pg_iscsi
Summary
Using the deployment scenario outlined in this guide, we have demonstrated that you can augment high-performance instance storage on AWS Outposts with on-premises external iSCSI storage to meet your need for data resiliency and durability while leveraging existing storage infrastructure. This hybrid approach provides the best of both worlds: the consistency and programmability of AWS services with the performance and data locality of on-premises storage.
