Active IQ Unified Manager 9.9: Backup and Restore using ONTAP Snapshot copies on iSCSI LUNs for Windows
In our NetApp® Active IQ Unified Manager 9.8 release, we introduced a backup and restore feature for an Active IQ Unified Manager database mounted on NFS on a Linux host. In our 9.9 release, we’ve expanded the backup and restore feature by adding support for Snapshot™ copy backup and restore of an Active IQ Unified Manager database when you are using Windows iSCSI LUNs.
By default, the Active IQ Unified Manager backup method is MySQL-based, however, we found MySQL-based backups to be inefficient, taking a long time to backup and restore the data and locking the database for several hours. By comparison, with Snapshot backup copies there is little disruption to your installation. The process runs quickly, usually taking a few minutes, and the Active IQ Unified Manager database is only locked for a short time. Because the Snapshot copy is created on an NetApp ONTAP® cluster, you can also take advantage of other NetApp features, such as SnapMirror® replication software, to create secondary protection.
In this blog, we show you how to use the Active IQ Unified Manager backup and restore feature using ONTAP Snapshot copies on iSCSI LUNs for a Windows system.
Before you start
Before configuring Active IQ Unified Manager for Snapshot copy backup and restore for Windows, you should perform some pre-configurations on the storage machine running ONTAP software and the Windows host machine.
Perform the following pre-configurations on the storage side:
- Configure an iSCSI enabled storage virtual machine (VM) or use an existing storage VM that has the same configuration
- Configure a network route for the configured storage VM
- Configure a volume that has the appropriate capacity and a single LUN and ensure that the volume is dedicated to this single LUN
- Configure an initiator group in the storage VM
- Configure a port set
- Integrate the initiator group (igroup) with the portset
- Map the LUN to the igroup
Perform the following pre-configurations on the host side:
- Clean up any previous configurations on the host machine
- Discover the target portal
- Connect to the target portal
- Connect to the target portal using multipath
- Discover both LIFs.
- Discover the LUN configured in the Windows machine as a device
- Configure a new drive as a new volume
How to configure Snapshot copy backups using iSCSI on Windows
After you complete the pre-configurations, you perform a one-time configuration to switch from the default MySQL to the Snapshot copy backup and restore feature. In the following steps, we show you how to perform this configuration using a Maintenance Console with iSCSI on Windows.
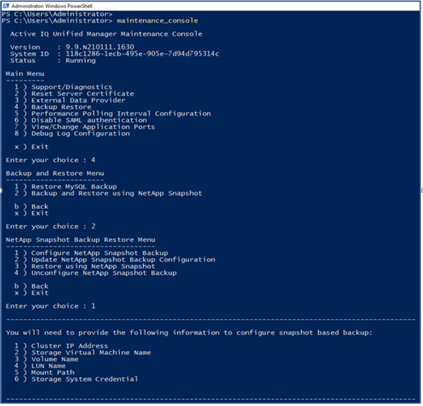
- First open the Windows PowerShell command-line utility and change the folder to “C:\Program Files\NetApp\ocum”. Start the Maintenance Console command-line utility by running the maintenance_console command on the Windows PowerShell utility.
- From the Main Menu, choose Option 4, Backup Restore.
- From the Backup and Restore Menu, choose Option 2, Backup and Restore using NetApp Snapshot.
- From the NetApp Snapshot Backup Restore Menu, choose Option 1, Configure NetApp Snapshot Backup.
- The system asks you to enter the Cluster IP Address, Storage VM name, mounted Volume Name, LUN Name, and Storage System Credential that you set up in the pre-configuration step and asks you to confirm if the information given is correct.
- If the connection is unsuccessful, for example, due an unreachable IP address or the incorrect credentials, the workflow halts with the appropriate error message on the console.
- After successfully connecting with the cluster, the console verifies that there is sufficient space as per the backup recommendations and lists the operations to configure the backup.
- Enter y to confirm the configuration operations and complete the workflow.
The Maintenance Console

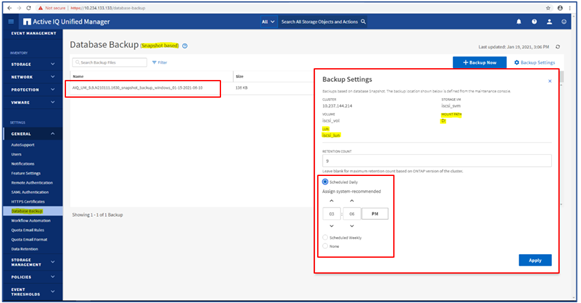
You can schedule backups
After you configure the backup configuration, you can schedule backup operations to create Snapshot copies by using the Backup Settings form under the Database Backup page. You can also customize the schedule to suit your needs and change the retention count for the Snapshot copies.
Database Backup page displaying Snapshot copy records

After a scheduled backup, an event is created in Active IQ Unified Manager and you can view the event details by selecting the Event Management tab.
Example of a backup event

You can restore Snapshot copies
In the event of data loss or corruption, you can restore Active IQ Unified Manager to the previous stable state with minimum data loss. By using the Active IQ Unified Manager Maintenance Console, you can easily restore the Active IQ Unified Manager Snapshot copy database to the same Windows system.
- Initiate the restore by launching the Maintenance Console on the Windows PowerShell utility.
- From the Main Menu, select Option 4, Backup Restore.
- From the Backup and Restore Menu, select Option 2, Backup and Restore Using NetApp Snapshot to get more options related to the Snapshot copy backup and restore feature.
- From the NetApp Snapshot Backup Restore Menu, select Option 3, Restore Using NetApp Snapshot and input your cluster administrator username and password. After the credentials are verified, the valid Snapshot copies are listed.
- Enter the Snapshot copy you want to restore and select y to confirm the operation.
During the restore operation, the Acitve IQ Unified Manager processes might be temporarily offline, but after the restore process completes, you can log in to the Acitve IQ Unified Manager UI and use the application as normal.
You can unconfigure the Snapshot copy backups for Windows
If you choose to, you can unconfigure the Snapshot copy backup feature on iSCSI on Windows and revert to the MySQL-based backup by simply following the process below.
- Follow the first two steps that we described for restoring Snapshot copies and then select Option 4, Unconfigure NetApp Snapshot Backup.
- This prompts the console to list the operations to unconfigure the Snapshot copy backup feature and asks you to confirm the operations.
- Enter y to confirm operation and complete the workflow.
Try It Out!
Now that you’ve read about our new Snapshot copy backup and restore feature using iSCSI on Windows, we hope it entices you to update and try out this new feature in Active IQ Unified Manager 9.9.
If you would like more information, contact us (ng-aiqum-feedback@netapp.com) and we would be happy to answer your questions.