Security Enhancements in Active IQ Unified Manager 9.9 Part 1: Import a Remotely Generated CSR
Welcome to our first blog in the NetApp Active IQ Unified Manager 9.9 security enhancements blog series on how to import externally generated certificates. In our previous versions of Active IQ Unified Manager, you generated a default HTTPS certificate during installation and Active IQ Unified Manager allowed you to generate a new key-pair to replace the old one. It was possible to export the public part of the certificate as a certificate signing request (CSR), and import it after it was signed by the certificate authority (CA).
With Active IQ Unified Manager 9.9, you can now import a certificate pair generated by using external tools such as OpenSSL, HashiCorp Vault, and so on, from an external machine. In this blog, we show you how to import an externally generated certificate into Active IQ Unified Manager using the OpenSSL toolkit.
Create a self-signed certificate
To generate a self-signed certificate, you first use the OpenSSL toolkit to generate the Remote Support Agent (RSA) private key and the CSR that you import into Active IQ Unified Manager. Let us go ahead and generate the private key and the CSR.
Step 1: Generate the private key
You use the OpenSSL toolkit to generate a private key by running the openssl genrsa command:
[root@scspo2371403001 ~]# openssl genrsa -out aiqum.key 4096
Generating RSA private key, 4096 bit long modulus
......++
.........................++
e is 65537 (0x10001)
Currently, Active IQ Unified Manager supports the following algorithms:
- RSA: RSA 2048, RSA 3072, and RSA 4096
- Elliptic Curve Cryptography (ECC): secp384r1 and prime256v1
After running the openssl genrsa command, you see that a key file named aiqum.key is generated.
Step2: Generate the CSR
After creating the key, you can go ahead and use the OpenSSL toolkit to create a new CA certificate by running the openssl req -new command:
[root@scspo2371403001 ~]# openssl req -new -key aiqum.key -out aiqum.csr
You are about to be asked to enter information that will be incorporated
into your certificate request.
What you are about to enter is what is called a Distinguished Name or a DN.
There are quite a few fields but you can leave some blank
For some fields, there will be a default value,
If you enter '.', the field will be left blank.
-----
Country Name (2 letter code) [XX]:
State or Province Name (full name) []:
Locality Name (eg, city) [Default City]:
Organization Name (eg, company) [Default Company Ltd]:
Organizational Unit Name (eg, section) []:
Common Name (eg, your name or your server's hostname) []:10.195.64.59
Email Address []:
Please enter the following 'extra' attributes
to be sent with your certificate request
A challenge password []:
An optional company name []:
At this point, you verify that the certificate request Common name (CN) contains either a proper Active IQ Unified Manager IP address or an Active IQ Unified Manager fully qualified domain name (FQDN) to ensure that all features continue to work seamlessly.
After running the openssl req -new command, you see that a CSR file named aiqum.csr file is generated.
Step 3: Generate the self-signed certificate
Now that you have generated the private key and the CSR, you can go ahead and create the self-signed certificate by running the openssl command:
[root@scspo2371403001 ~]# openssl x509 -req -days 400 -in aiqum.csr -signkey aiqum.key -out aiqum.crt
Signature ok
subject=/C=XX/L=Default City/O=Default Company Ltd/CN=10.195.64.59
Getting Private key
After running the openssl req -new command, you see that a self-signed certificate file named aiqum.crt file is generated.
Step 4: Create the Privacy Enhanced Mail (PEM) file
When it comes to uploading the self-signed certificate, the file should be in the .pem format. In the PEM file, you should first paste the private key and then append the certificates from the end-user to root one after another in a sequence. Here are sample formats for creating a PEM file with an RSA and an ECC key-pair.
Here is a sample format for loading a certificate with an RSA Key-pair:
*************************************************
-----BEGIN RSA PRIVATE KEY-----
MIIEpAIBAAKCAQEAvIvQvqQ6rYfxcUrm24y+s/20hem3+GlxZ+5NRYlyu1YXg8iN
…..
-----END RSA PRIVATE KEY-----
Certificate:
Data:
Version: 3 (0x2)
Serial Number: 1 (0x1)
Signature Algorithm: sha256WithRSAEncryption
………
-----BEGIN CERTIFICATE-----
MIIDgzCCAmugAwIBAgIBATANBgkqhkiG9w0BAQsFADBvMQswCQYDVQQGEwJYWDES
…..
-----END CERTIFICATE-----
-----BEGIN CERTIFICATE-----
MIIDvzCCAqegAwIBAgIUNuYBIGVxooBhKHXbNjw4AiWumWkwDQYJKoZIhvcNAQEL
…..
-----END CERTIFICATE---
Here is a sample format for loading a certificate with an ECC Key-pair:
*************************************************
-----BEGIN EC PRIVATE KEY-----
<RSA/DSA/EC private key of Server>
-----END EC PRIVATE KEY-----
-----BEGIN CERTIFICATE-----
<Server certificate>
-----END CERTIFICATE-----
-----BEGIN CERTIFICATE-----
<Intermediate certificate #1 (if present)>
-----END CERTIFICATE-----
-----BEGIN CERTIFICATE-----
<Intermediate certificate #2 (if present)>
-----END CERTIFICATE-----
-----BEGIN CERTIFICATE-----
<Root signing certificate>
-----END CERTIFICATE-----
***************************************************
Upload the certificate into Active IQ Unified Manager
After creating the PEM file, you can easily upload the certificate into Active IQ Unified Manager by following the procedure below.
Steps
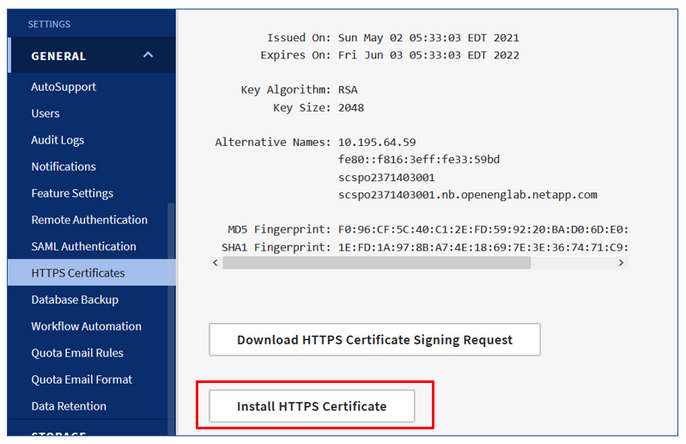
- You first open Active IQ Unified Manager by selecting General in the left navigation pane followed by HTTPS Certificates > Install HTTPS Certificate.

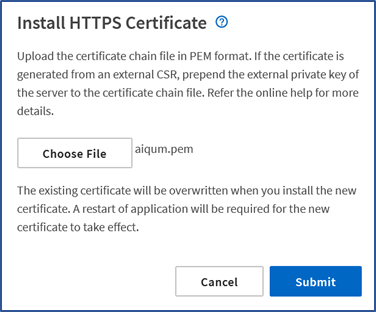
2. Now the Install HTTPS Certificate page opens. Select the Choose File button, choose the appropriate PEM file, upload the file, and select Submit.

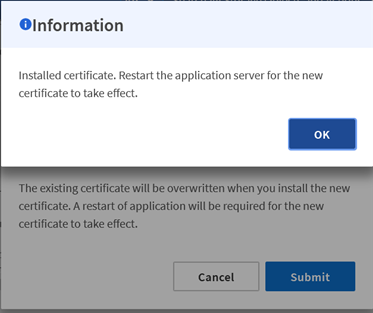
3. When the PEM file is in the correct format, the file is accepted and you are asked to restart the Active IQ Unified Manager application server for the new certificate to take effect.

At this point, you have the option to upload the root-CA certificate in the browser to enable the browser to treat the certificate chain as valid and show Active IQ Unified Manager as protected.
4. Go ahead and restart the Active IQ Unified Manager server and reload the certificate page by using the systemctl restart ocie and systemctl restart ocieau commands.
After the upload completes, you can continue with all Active IQ Unified Manager operations.
This completes our introduction to importing externally generated certificates using the OpenSSL toolkit and we hope it entices you to update and try Active IQ Unified Manager 9.9.
If you would like more information, contact us (ng-aiqum-feedback@netapp.com) and we would be happy to answer your questions.