Active IQ Unified Manager 9.8 now allows you to perform backup and restore using ONTAP® Snapshot™ copies of the Unified Manager database. In this blog, we explore this feature in depth to help you understand how to use it.
Backup and Restore using ONTAP Snapshot copies
ONTAP Snapshot copies are an efficient way to create backups because they create a point-in-time image of the Unified Manager database and configuration files. These Snapshot copies can be used for restore operations in case of a Unified Manager server failure. Through the Active IQ Unified Manager GUI, you can schedule Snapshot backups as required. Please note that, in Unified Manager 9.8, this function is available only when Unified Manager is installed on a Red Hat Enterprise Linux or CentOS Linux server. The ONTAP volume used must be an NFS share and mounted via NFSv4.
See the following advantages of Snapshot copy-based backups:
- Snapshot copy-based backups take very little time.
- This backup method take up very little space.
- It incurs less performance overhead on the Unified Manager server.
- Since the Snapshot copy is created on an ONTAP cluster, you can take advantage of other NetApp features such as SnapMirror® technology to create secondary protection if required.
Pre-configuration
- Before you configure a Snapshot copy-based backup, you must set up the destination location for Unified Manager Snapshot backups on an ONTAP volume that you have already configured in one of your ONTAP clusters.
- Make sure the cluster ONTAP version is greater than 9.3. Also, make sure that the Storage Virtual Machine has only the CIFS or the NFSv4 protocol enabled.
- When creating the volume, its size should be at least double the size of the Unified Manager /opt/netapp/data directory, the security style must be set to UNIX, and volume auto-size should be enabled.
- The performance service level should be set to a policy with high IOPS and low latency, such as Extreme.
- Make sure to have the volume mounted to the Unified Manager host and have the mount path ready.
Configuring Snapshot-based Backups
Let’s go ahead and configure NetApp Snapshot Backup.
- After the destination volume is configured, let’s configure the backup by selecting option 3 Backup Restore from the Main Menu in the maintenance console.
- Enter option number 2 to select Backup and Restore Using Snapshot Backup and get more options related to Snapshot copy-based backup (Figure 1).
- Choose option number 1 to select Configure NetApp Snapshot Backup (Figure 2).

Figure 1

Figure 2
- After the Snapshot Backup Configuration Menu pops up, you have the option to configure NFS volumes or LUNs as the backup destination. In this example, let’s go ahead and configure the NFS volume by choosing option 1. Under the NFS Configuration Menu, choose option 1 (Figure 3).

Figure 3

Figure 4
- Now enter the cluster management IP address, the Storage VM, the volume name, the storage system username, and the password. After you enter these details, they are verified by making a connection to the cluster to get its version information. If the connection is unsuccessful due to an IP that is not reachable or the wrong credentials, this workflow exits at this point with the appropriate error message on the console (Figure 4).
- Then the console lists the operations to be done to configure the backup, and it also asks for user confirmation for upcoming operations (Figure 5).

Figure 5

Figure 6
- Enter y to confirm, and the workflow proceeds and ends successfully (Figure 6).
Scheduled Backups:
After the backup is configured, we can schedule backups for the required regular interval. Scheduled backup can be configured using Backup Settings under Database Backup. You can set a backup schedule so that Snapshot copies are created according to the schedule. The Snapshot copy records are displayed in the UI as shown in the following screenshot. You can also change the retention count for the Snapshot copies as well (Figure 6).

Figure 7
Restore Snapshot
In the event of data loss or corruption, you can restore Unified Manager to the previous stable state with a minimum loss of data. You can restore the Unified Manager Snapshot copy database to a local or remote Red Hat Enterprise Linux or CentOS system by using the Unified Manager maintenance console.
- To initiate a restore, launch the Maintenance Console. Select option 3 Backup Restore from the Main Menu (Figure 8).
- Enter option 2 to select Backup and Restore Using Snapshot Backup to get more options related to Snapshot copy-based backup (Figure 9).
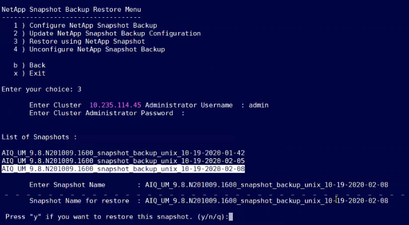
- Choose option number 3 to select the Restore Using NetApp Snapshot (Figure 10).
- Now input the cluster administrator username and password. After the credentials are verified, the valid Snapshot copies are listed (Figure 10).
- Enter the Snapshot copy to be restored and give the user confirmation by pressing y (Figure 10).

Figure 8

Figure 9

Figure 10
- While the restore operation is proceeding, Unified Manager processes might be offline temporarily.
- Please note, when you are performing a restore onto a new server after installing Unified Manager, make sure to not launch the UI or configure any clusters, users, or authentication settings until the installation is complete.
- After the restore process is complete, you can log in to the Unified Manager user interface (Figure 11).

Figure 11
Try it Out!
We hope that you now understand how to take a Snapshot copy-based backup for Unified Manager. Try it out and let us know your feedback, and please let us know if you have any questions about this subject.