Tech ONTAP Blogs
- Home
- :
- Blogs
- :
- Tech ONTAP Blogs
- :
- Cloud Backup Support for Cloud Manager Dark-Site Deployments
Tech ONTAP Blogs
Cloud Backup Support for Cloud Manager Dark-Site Deployments
Cloud Backup Support for Cloud Manager Dark-Site Deployments
Certain organizations have strict security policies which don’t allow open connections to the internet and don’t allow inbound/outbound network traffic to and from their data centers. Also, for many organizations, there is imperative to keep data protected with the highest level of security standards—simply backing up to the public cloud is not an option. This would essentially mean that such organizations cannot utilize cloud storage services to move their secondary backups to the cloud. This can create serious on-prem storage crunch issues, especially when it comes to storing infrequently used backup data.
Cloud Backup now comes with a self-managed, or “software-only” mode. With the software-only option, users have more control to keep data securely stored within their data centers. The chief feature of the software-only option is that it does not need any outbound internet connectivity. This makes it ideal for customers who would like to manage their data backups in the private cloud.
In this blog, we’ll look at how Cloud Backup support for dark-site deployments provides all the benefits of automatic, block-level forever backup and restore for users, and how it can be installed and used.
What is Cloud Manager Dark-Site Deployments
There are 3 kinds of customer environments for which we look to enable cloud services, based on the customer’s ability to allow inbound/outbound network from the data center.
- Most traffic is allowed both ways – aka SaaS
- Traffic is allowed except for specific restrictions on some destinations – aka Gov Cloud
- No access whatsoever – aka Dark Site
Dark sites are a deployment method normally used by high-security installations (government, military, and intelligence communities, as well as select highly regulated financial services) where they need to ensure there are no external network connections that present the opportunity for breach. Most often we'll see this in the intelligence communities, but other industries may apply this method for the protection of intellectual property and regulated data.
There are 2 types of “Dark Sites” deployments.
- On-premises
- Cloud: Secret regions in AWS C2S /SC2S and Azure IL6
Cloud Backup SaaS deployment usually requires outbound communication from the customer’s data center to the SaaS-based UI and other essential endpoints for day-to-day operations but the software-only option does not. With the software-only option, all packages, dependencies, and essential components are packed as a single bundle software that can be installed and run on a local machine. The application can be installed or updated via an installer, like a traditional software product. In this deployment model, backup storage is kept locally in the data center without consuming any resources over the internet.
Understanding Cloud Backup Dark Site Deployment
In dark site deployment, Cloud Manager services, Cloud Backup services, and the required databases are installed and run on a local Linux machine that resides on the private cloud. These services work together and are sustained within the dark site without requiring any external internet connection. These services are designed to take backups of ONTAP clusters which are then moved to StorageGRID S3 object store. Adding NetApp Cloud Backup cloud-integrated data protection, you can extend your StorageGRID Webscale cloud to include backups and cold archived data.
When you enable Cloud Backup on the on-premises ONTAP system, the service performs a full backup of your data. Volume snapshots are not included in the backup image. After the initial backup, all additional backups are incremental, which means that only changed blocks and new blocks are backed up. This keeps network traffic to a minimum.
Backup copies are stored in an object store that Cloud Manager creates in your cloud account. There’s one object store per cluster/working environment, and Cloud Manager names the object store as follows: "netapp-backup-clusteruuid". Be sure not to delete this object-store. In StorageGRID, Cloud Manager uses an existing storage account for the object store bucket.
Requirements
The Connector software must run on a host that meets specific operating system requirements, RAM requirements, port requirements, and so on. A dedicated host is required. The Connector is not supported on a host that is shared with other applications. The host must be a dedicated host.
Host OS Requirements
Supported operating systems
- Red Hat Enterprise Linux 7.6
- Red Hat Enterprise Linux 7.7
- Red Hat Enterprise Linux 7.8
- Red Hat Enterprise Linux 7.9
- Red Hat Enterprise Linux 8.0
The Red Hat Enterprise Linux system must be registered with Red Hat Subscription Management. If it is not registered, the system cannot access repositories to update required 3rd party software during Connector installation.
The Connector is supported on English-language versions of these operating systems.
Hardware Requirements
- CPU:
- 4 cores or 4 vCPUs
- RAM
- 16 GB
- Hypervisor
- Bare metal or hosted hypervisor that is certified to run Red Hat Enterprise Linux
Red Hat Solution: Which hypervisors are certified to run Red Hat Enterprise Linux?
- Bare metal or hosted hypervisor that is certified to run Red Hat Enterprise Linux
- Disk type
- An SSD is required
- Disk space in /opt
- 100 GiB of space must be available
- Disk space in /var
- 20 GiB of space must be available
Docker Engine
Docker Engine version 19 or later is required on the host before you install the Connector. View installation instructions.
User Authorization Requirements
Installation of Unified Manager on a Linux system can be performed by the root user or by non-root users by using the sudo command.
StorageGRID Requirements
- StorageGRID Fully Qualified Domain Name and port number
- StorageGRID Access Key
- StorageGRID Secret Key
Installing Cloud Manager Dark-Site with Cloud Backup Support
Downloading the Installer:
- Log in to the NetApp Support Site, and navigate to the Download page for installing Cloud Manager on the Red Hat Enterprise Linux platform. https://mysupport.netapp.com/products/index.html
- Download the Cloud Manager dark site installer .zip file to a directory on the target system.
- Verify the checksum to ensure that the software downloaded correctly.
Installing Cloud Manager Dark-Site with Cloud Backup Support
In this section, we will discuss how Cloud Manager DarkSite with Cloud Backup Support can be installed.
- Verify that docker is enabled and running.
sudo systemctl enable docker && sudo systemctl start docker
- Copy the installer to the Linux host.
- Assign permissions to run the script.
chmod +x /path/ darksite-installer
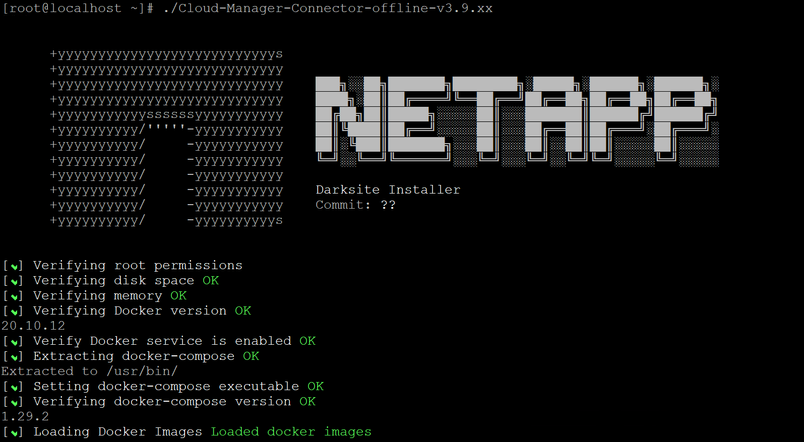
4. Run the installation script:
sudo /path/ darksite-installer
Setting Up Cloud Manager Dark-Site with Cloud Backup Support:
Now that we have installed Cloud Manager DarkSite with Cloud Backup Support, let's go ahead and examine how it can be configured and set up.
- Open a web browser and enter https://ipaddress where ipaddress is the IP address of the Linux host.
You should see the following screen. Click on set up new Cloud Manager.
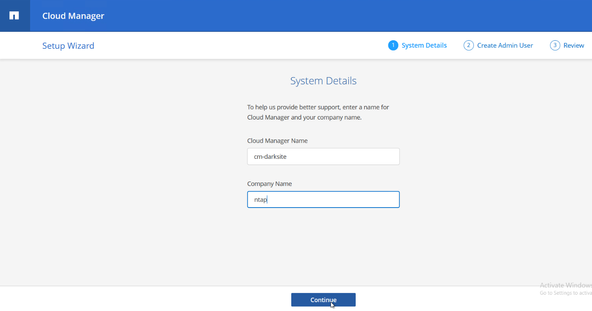
- In the next screen, given in the System details. Enter a name for the Cloud Manager and a company name. This information helps us to provide better support. After entering the details, click on “Continue”
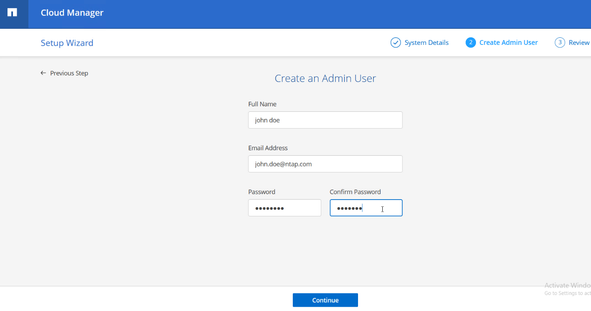
- Now let's create an admin user. Enter the full name, email address, and password. Click on “Continue”.
- Review the details and click on “SetUp”.
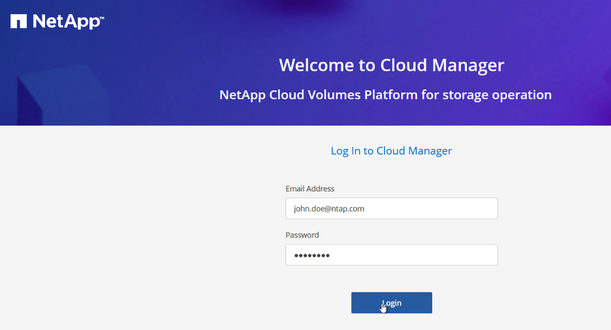
- The Cloud manager will take a few seconds to set up the admin user after which it will revert to the Cloud Manager login page. Here enter the email address and the password and click on “Login”. Upon clicking log in, you should be successfully logged into the Cloud Manager application.
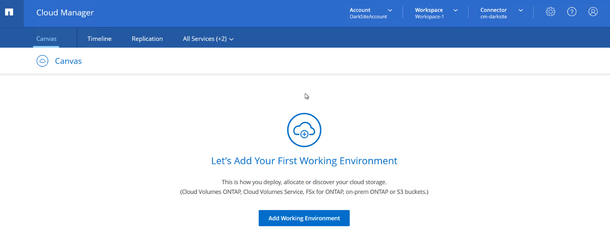
- Once you are logged in, it asks the user to go ahead and add the first working environment. Click on “Add Working Environment” to start the wizard that will help you add the On-Premise ONTAP Systems.
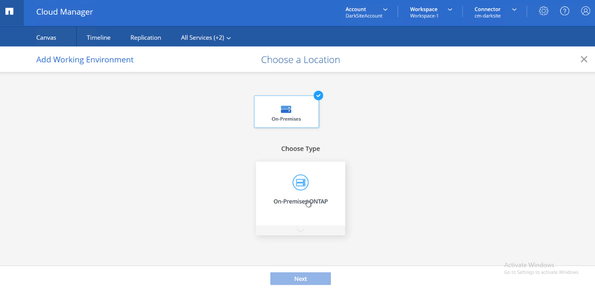
- Choose “On-Premises” -> “On-Premises ONTAP” and click on “Next”.
- Now give in the Cluster Management IP address, username, and password. Click on “Add”.
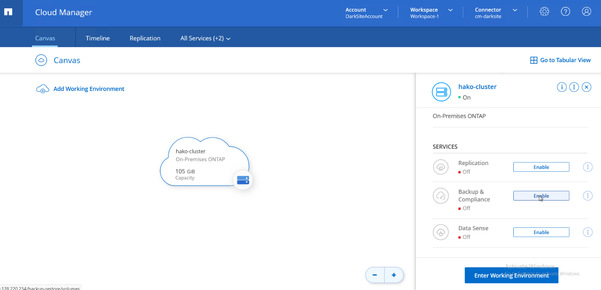
- The on-premise ONTAP system will be added as Working Environment to Cloud Manager. Now Click on the discovered working environment and it will list all the services that can be assigned to the working environment and their current status. On the “Backup and Compliance” service tab, click on “Enable”.
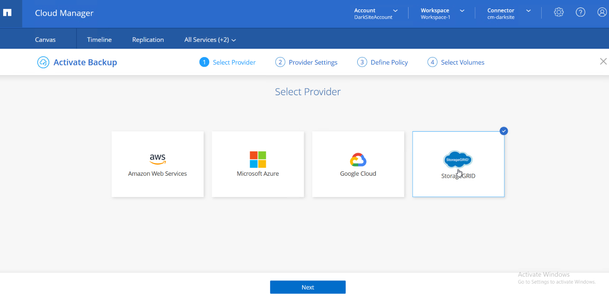
- Choose "StorageGRID" and click “Next”.
- Give the details of the StorageGRID
- StorageGRID Fully Qualified Domain Name.
- StorageGRID Access Key
- StorageGRID Secret Key
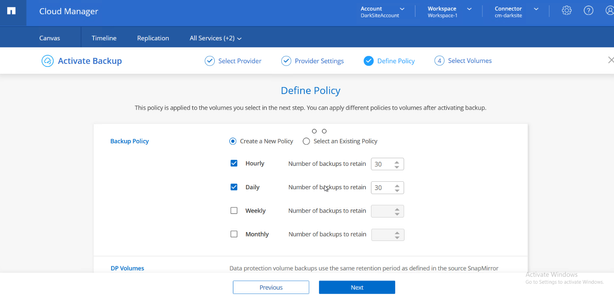
- Go ahead and define a policy. Choose the appropriate backup schedule and the retention count. Click on “Next”.
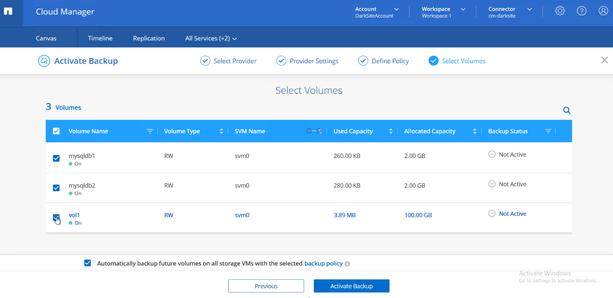
- Choose the required volumes that need to be backed up. Click on “Activate Backup”. If you would like to automatically backup future volumes, make sure to click on the check box.
- Cloud Manager, will now activate the backup of the chosen volumes.
Let us know…
Please try it out and let us know. In this blog , we haven’t covered every possible scenario, and we know that you’ll have questions and concerns, so please contact us on Teams Group.

