This site will enter Read Only mode on July 23 as we prepare to move to a new platform. You will still be able to view content, but posting and replying will be temporarily disabled.
We're excited to launch our new Community experience on July 30 and more information will follow soon.
Stay connected during the transition - Join our Discord community today.
Simulator Discussions
- Home
- :
- Developer Network
- :
- Simulator Discussions
- :
- Second 8.1.2 Simulator PANIC: Can't find device with WWN 0x428283648
Simulator Discussions
- Subscribe to RSS Feed
- Mark Topic as New
- Mark Topic as Read
- Float this Topic for Current User
- Bookmark
- Subscribe
- Mute
- Printer Friendly Page
Second 8.1.2 Simulator PANIC: Can't find device with WWN 0x428283648
- Mark as New
- Bookmark
- Subscribe
- Mute
- Subscribe to RSS Feed
- Permalink
- Report Inappropriate Content
Trying to fire up my second 8.1.2 sim on ESX 4.1, have changed the S/N and sysid, but didn't use what was in the install doc, just changed the last number from "9" to "8".
The document (yes, the 8.1.2 version) doesn't address the question that comes up on next boot "Override system id? {y|n} [n]" I answered "y" - should it be "n"? After doing this, on next boot, printenv still seems to report the corrected numbers.
Trying this again with the S/N and sysid in the doc, but not expecting different results... nope, same thing. If I answer "n" it just says "correct the problem and reboot".
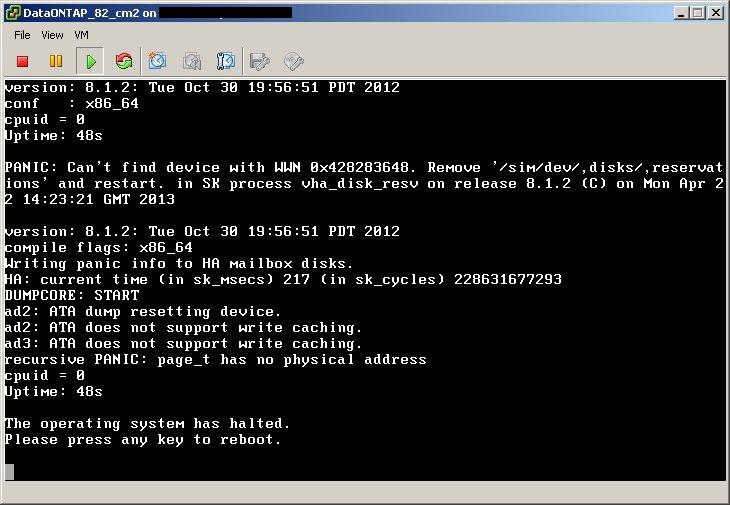
More of the error message: "Remove '/sim/dev/,disks/,reservations' and restart. in SK process vha_disk_resv on release 8.1.2 (C)...."
- Mark as New
- Bookmark
- Subscribe
- Mute
- Subscribe to RSS Feed
- Permalink
- Report Inappropriate Content
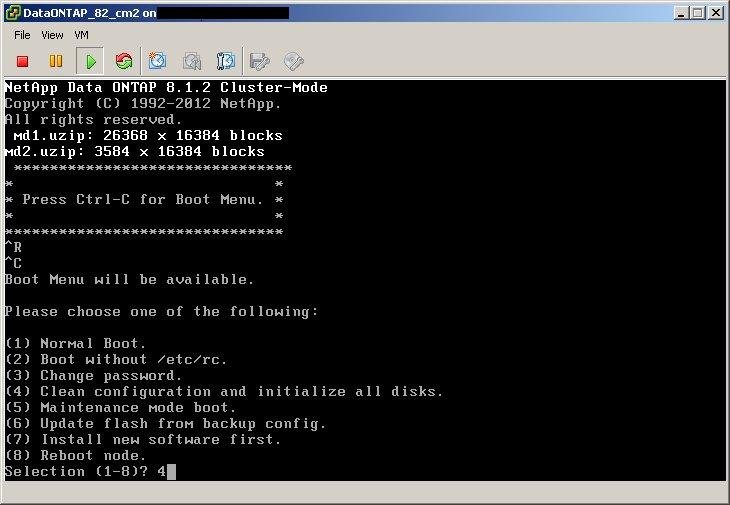
you need to change the SL number during first boot of New Simulator , and Ctrl-C to boot menu , option 4 for clean config ,fresh config
http://support.netapp.com/NOW/download/tools/simulator/ontap/8.1/cluster_setup_note.txt
- Mark as New
- Bookmark
- Subscribe
- Mute
- Subscribe to RSS Feed
- Permalink
- Report Inappropriate Content
Ok, well I did that - please re-read my first line. Only as I mentioned, I didn't use the numbers in the install document. If for some reason this change isn't made properly on "first boot" of the second instance, what happens? Is it trashed somehow? Do I need to make a new copy of the files?
I've tried changing those numbers several times now, and I keep getting the same panic after getting to the boot menu and selecting #4.
Thanks -Dave
- Mark as New
- Bookmark
- Subscribe
- Mute
- Subscribe to RSS Feed
- Permalink
- Report Inappropriate Content
Hi Dave,
>I keep getting the same panic after getting to the boot menu and selecting #4.
Would it be possible for you to post a screenshot of panic . we could help more better
also can you show us the printenv output.
-Srinivas
- Mark as New
- Bookmark
- Subscribe
- Mute
- Subscribe to RSS Feed
- Permalink
- Report Inappropriate Content

- Mark as New
- Bookmark
- Subscribe
- Mute
- Subscribe to RSS Feed
- Permalink
- Report Inappropriate Content
Thanks David,
Screenshot looks fine.
Are you able to reach boot menu (by pressing Control+C) and Can you paste a screenshot after you press option 4 on boot menu
Option 4 ideally would cleanup and initialize (reboot)
-srinivas
- Mark as New
- Bookmark
- Subscribe
- Mute
- Subscribe to RSS Feed
- Permalink
- Report Inappropriate Content
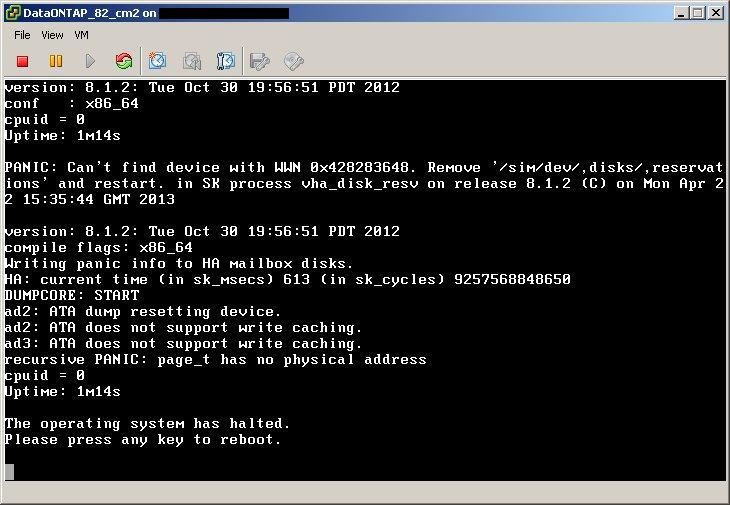
I'm getting to the boot menu, and trying option 4. That's when I get the panic:
Wondering if there is a problem with the actual files on the datastore. When I used the Upload from the Datastore Browser, it didn't look like all the files were getting copied, so in at least one case I logged into the ESX CLI and untarred the sim tarball there. That might have preserved some incorrect permissions or something....?
- Mark as New
- Bookmark
- Subscribe
- Mute
- Subscribe to RSS Feed
- Permalink
- Report Inappropriate Content
Same issue here. Tried changing serial number as with 8.1.1 vsim and kaboom.
Is this still necessary? I thought this changing of the sysid/serial was a workaround to System Manager's inability to differentiate 2 vsims.
Can it be fixed there, instead?
wes
- Mark as New
- Bookmark
- Subscribe
- Mute
- Subscribe to RSS Feed
- Permalink
- Report Inappropriate Content
If you volume snapmirror between two systems you will have the same issue, it isn't just an issue with System Manager. Any process that takes the sysid/serial into account will see this issue.
-Scott
- Mark as New
- Bookmark
- Subscribe
- Mute
- Subscribe to RSS Feed
- Permalink
- Report Inappropriate Content
I have the same problem. Can Netapp spend two sim downloads with two different S/N already configured?
Klaus
- Mark as New
- Bookmark
- Subscribe
- Mute
- Subscribe to RSS Feed
- Permalink
- Report Inappropriate Content
I uploaded a 'fresh' copy of all the Sim files using Datastore Browser, added to inventory, and made sure I did the S/N and sysid changes on first power-on. Then I was able to initialize, boot, and join the cluster. I'm guessing there was something wrong with the previous file sets.
- Mark as New
- Bookmark
- Subscribe
- Mute
- Subscribe to RSS Feed
- Permalink
- Report Inappropriate Content
Hi David,
I was having same issue, try this
1) get a new sim ,
2) in the firstboot , change the serial number ( note down the old serial number and new serial number )
3) after changing the serial number , in the next boot , do a control -C and select 5 for Maintainance boot
4) now assign all disk to new serial number "disk assign -s OLDSERIALNO -d NEWSERIAL "
5) now reboot and hit control-c and slect 4 for clean configuration
6) clean configuration takes some time for zeroing disk , but it's ok to wait
Let me know how it go ...
- Mark as New
- Bookmark
- Subscribe
- Mute
- Subscribe to RSS Feed
- Permalink
- Report Inappropriate Content
FWIW,
I have had the best luck setting them up in workstation (with the workstation image), exporting to OVF and then importing them into ESX (5.1 for me currently) I had a lot of panic issues loading the ESX image into ESX.
- Mark as New
- Bookmark
- Subscribe
- Mute
- Subscribe to RSS Feed
- Permalink
- Report Inappropriate Content
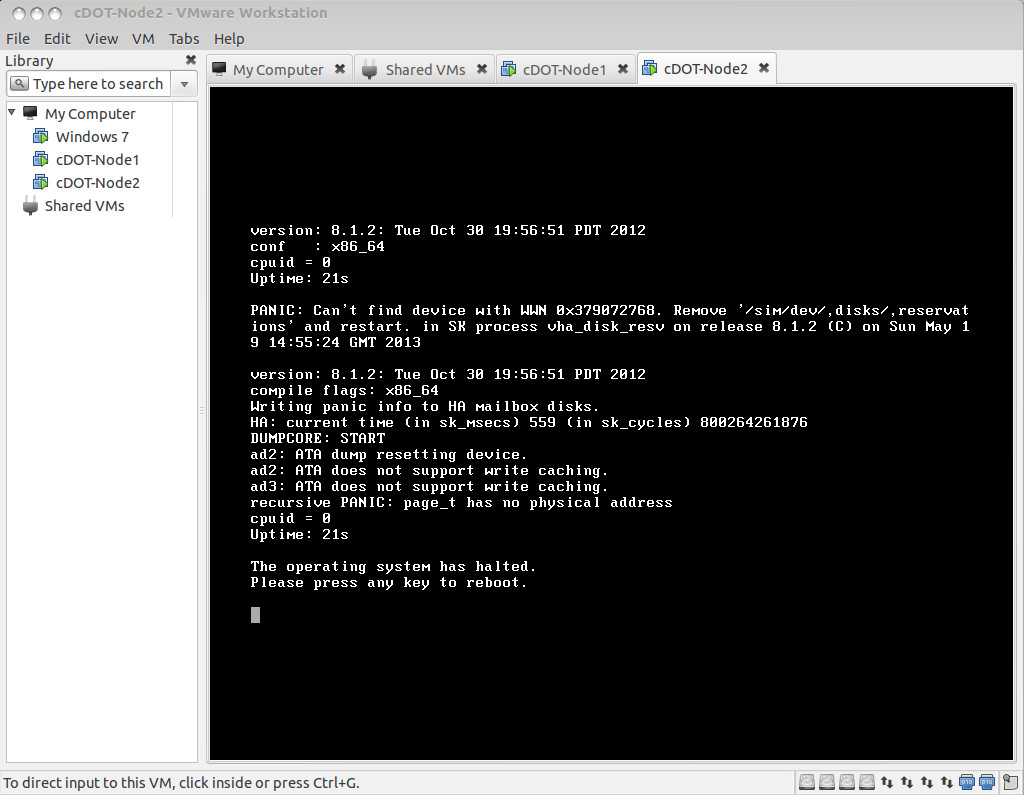
I get the following results when changing the serial number from the LOADER prompt, then doing a "boot". The sim does a reboot, then goes into this loop.
I tested this by taking a freshly downloaded, tested out-of-box OK 8.1.2 workstation image.
I re-extracted to a new folder, registered the VM with workstation, then did the SN change to -7 instead of the factory -6 (4055372-81-?).
I made a VM snapshot, so I've got a great testbed set up for QA, so any guidance from the developers would be good.
I still like the idea of a OVA image deployment to help the field get their cDOT chops up to speed... It's enough to have to make the shift from 7-mode to cDOT, but even more trouble to have a REAL cDOT system to learn on...
One node simply doesn't do it for me, but it's a start.
It used to be possible to add 2 extra nics and a shelf or 2 to the vsim in 7mode. That enables you to have a cluster network+client network+intercluster snapmirror connection at the same time, so you could show off some of the fancier architecture under the hood of cDOT.
Anyone get the working under the current cDOT 8.1.2 workstation or vSphere image?
-wes

EDIT: Might as well add my latest test results:
1. Poweron fresh vsim. No change SYS_SERIAL_NUM yet from LOADER>, do a CTRL-C to allow firstboot to create the disks.
2. option 5, disk assign all, halt.
3. LOADER - set new SYS_SERIAL_NUM and sysid to increment by 1. (i use "setenv SYS_SERIAL_NUM 4055372-81-7", and "setenv bootarg.nvram.sysid 4034389062", then halt)
4. CTRL-C, option 5, but never gets there... I want to change ownership at this point, and I should be golden.
help
- Mark as New
- Bookmark
- Subscribe
- Mute
- Subscribe to RSS Feed
- Permalink
- Report Inappropriate Content
Additional NICs work fine, but the VMX file shipped with the SIM is a mess. Here's how to build a clean one from scratch:
1. Create a new VM, of type FreeBSD (x64), 2vCPUs, 1600MB RAM, 6 NICs, and NO Hard drives
2. Add the CF vmdk on IDE 0:0
3. Add the VAR vmdk on IDE0:1
4. Add the NVRAM vmdk on IDE1:0
5. Add the SIM vmdk on IDE1:1
6. Add the following options to the VMX, or as advanced options in ESX:
monitor_control.pseudo_perfctr = "TRUE"
pciHole.start = "1024"
timeTracker.forceMonotonicTTAT = "TRUE"
monitor_control.disable_tsc_offsetting = "TRUE"
monitor_control.disable_rdtscopt_bt = "TRUE"
Note: cMode vSims put the PCI hole at 3072.
- Mark as New
- Bookmark
- Subscribe
- Mute
- Subscribe to RSS Feed
- Permalink
- Report Inappropriate Content
Following you on this one, with 8.2RC1 now that it's out.
To clarify, the "CF vmdk" on the workstation version is the file named "DataONTAP.vmdk".
Added 6 nics to both of them, and changed the sysid on them with NO PROBLEMS.
Only thing I didn't do yet is add the serial ports, but they're working fine right now!
GREAT WORK!
Post-Setup Note:
I was also able to follow this how-to on getting 2 more disk shelves (28 disks!) to the 8.1.2RC1 simulator after building it with this method.
Adding Disks to a Cluster-Mode Simulator
These are the steps for adding disks to a single Cluster-Mode simulator. For a system with multiple nodes, you will need to perform this sequence for each node.
1. Unlock the "diag" user and assign it a password:
> security login unlock -username diag
> security login password -username diag
Please enter a new password: <password>
Please enter it again: <password>
2. Log in to the system shell using the diag user account:
> set -privilege advanced
*> systemshell local
login: diag
password: <password>
3. Add the directory with the simulator disk tools to the path:
% setenv PATH "${PATH}:/usr/sbin"
% echo $PATH
4. Go to the simulated devices directory:
% cd /sim/dev
% ls ,disks/
At this point you will see a number of files which represent the simulated disks. Notice that these files start with "v0." and "v1.". That means the disk are attached to adapters 0 and 1, and if you count the disk files you'll see that there are 14 of them on each adapter. This is similar to the DS14 shelf topology with each shelf attached to its own adapter.
5. Add two more sets of 14 disks to the currently unused adapters 2 and 3:
% vsim_makedisks -h
% sudo vsim_makedisks -n 14 -t 23 -a 2
% sudo vsim_makedisks -n 14 -t 23 -a 3
% ls ,disks/
The first invocation of the command prints usage information. The remaining two commands tell the simulated disk creation tool to create 14 additional disk ("-n 14") of type 23 ("-t 23") on adapters 2 and 3 (e.g., "-a 2"). As you can see from the output of vsim_makedisks -h, type 23 disks are 1GB disks. You can add a different size and type of disk using the number that corresponds to the disk type. Note that Data ONTAP 8.1.1 supports simulated disks up to 9GB (type 36 and 37), but make sure you have the space to add such large disks.
6. Now we're done with the system shell. We need to reverse some of the earlier steps and reboot the simulator so that it sees the new disks:
% exit
*> security login lock -username diag
*> system node reboot local
Warning: Are you sure you want to reboot the node? {y|n}: y
7. After the reboot completes, log back in and take ownership of all the disks.The example below is for a brand new system where all but disks in the root aggregate are currently unowned. *NOTE: I used the CTRL-C, Maintenance Mode, "disk assign all" to assign the ownership, since my cluster node wasn't setup yet...
Substitute the name of the node for <nodename> in the commands below:
> storage disk show
> storage disk modify -disk <nodename>:v4.* -owner <nodename>
14 entries were modified.
> storage disk modify -disk <nodename>:v5.* -owner <nodename>
14 entries were modified.
> storage disk modify -disk <nodename>:v6.* -owner <nodename>
14 entries were modified.
> storage disk modify -disk <nodename>:v7.* -owner <nodename>
14 entries were modified.
> storage disk show
You should now see 56 disks of 1GB each listed in the simulator. The disks should be listed as already zeroed and ready to use inside an aggregate.
- Mark as New
- Bookmark
- Subscribe
- Mute
- Subscribe to RSS Feed
- Permalink
- Report Inappropriate Content
Thats the way they've documented it, and thats what I call the educational way. It takes you through the diag user config and the system shell.
There is of course an easier way:
1. Reboot and press space to get into the loader prompt
2. type the following:
setenv bootarg.vm.sim.vdevinit 23:14:2,23:14:3
setenv bootarg.sim.vdevinit 23:14:2,23:14:3
boot
You may or may not still have to "disk assign all". Auto assign is on by default but its a little twitchy in the sim.
- Mark as New
- Bookmark
- Subscribe
- Mute
- Subscribe to RSS Feed
- Permalink
- Report Inappropriate Content
I cheated. The sim is based off FreeBSD.
I built a second VM with no hard drive. added the large disk to that VM and booted off the FreeBSD 9.1 Live Disk.
Drive was recognized as /dev/ada0 (ran a "dmesg | grep VMware").
I ran an "fsck -t ufs /dev/ada0" and once that cleared I ran "mount -rw /dev/ada0 /mnt". This mounted the disk.
I then went "cd /mnt/dev/,disks" and finally did a "rm ,reservations".
Follow it up with a "umount /mnt" and shutdown the VM. Remove the hard drive (not delete) and started the sim back up. Seems to work like a champ now. I can Ctrl+C and option 4 without an error.
- Mark as New
- Bookmark
- Subscribe
- Mute
- Subscribe to RSS Feed
- Permalink
- Report Inappropriate Content
Thanks for sharing,
I followed steps and all is fine now.
Bernard
