Stay connected during the transition - Join our Discord community today.
Simulator Discussions
- Home
- :
- Developer Network
- :
- Simulator Discussions
- :
- Simulate ONTAP 8.1.1 withVirtualBox
Simulator Discussions
- Subscribe to RSS Feed
- Mark Topic as New
- Mark Topic as Read
- Float this Topic for Current User
- Bookmark
- Subscribe
- Mute
- Printer Friendly Page
- Mark as New
- Bookmark
- Subscribe
- Mute
- Subscribe to RSS Feed
- Permalink
- Report Inappropriate Content
There have been a small number of posts both here and in the support community about the change between the 7.3 family of OnTap simulators and those for 8.1.1. The delivery model changed from being one where you install the simulator on a Linux system (easily setup on any virtualization platform you have) to the model in 8.1.1 Simulator where you download a full virtual machine image designed for use in a VMWare environment only.
Many people will have access to one of the paid options (VMWare Workstation/Fusions/ESX) or can use the free VMWare Player on Windows. But, for those that need alternatives such as on a Linux or Solaris host platform or something free on a Mac, here are instructions to setup 8.1.1 Simulator on VirtualBox.
Disclaimer: to date I have only tested this on a single Windows platform. Specifically, I tested this on a 32 bit Windows 7 host (but on 64 bit capable hardware). Basic setup and general operations seem normally functional, though I have not delved into all the possibilities that OnTap offers. The 7-mode simulator is the one on which I did most checkouts since this is what I need to make available to other team members where I work. I have done minimal setup only on cluster mode. None of this is technically supported by NetApp, and your mileage may vary.
Test environment: Dell laptop, 3GB RAM running Windows 7 SP1 32 bit; VirtualBox 4.2.4r81684; Simulate OnTap 8.1.1. As per the VirtualBox documentation, you will need a 64 bit processor with virtualization enhancements enabled even if the host OS is 32 bit.
Setup (assumes basic familiarity with VirtualBox)
1. Download and install VirtualBox. I just used defaults for setup.
2. Download the 8.1.1 simulator. Extract the files somewhere that you want them to be.
3. Create a new Virtual Machine with OS type BSD, version FreeBSD (64 bit). Memory required is 1600MB. Don't select a virtual hard drive now, we need to select a bunch later. Save the new machine.
4. Open the Settings for the new VM. On the System page, Processor tab, set CPU to 2
5. On the Storage path, delete the CDROM from the IDE controller. Then, add 4 virtual hard disks to the controller. For each disk, you will choose an existing disk. The disks you will add, in order, are "DataONTAP.vmdk", "DataONTAP-var.vmdk", "DataONTAP-nvram.vmdk", and "DataONTAP-sim.vmdk". Finally, add a Floppy controller with a single, empty floppy drive. When complete, the storage setup for your new virtual machine should look like:

6. On the audio page, uncheck "Enable Audio".
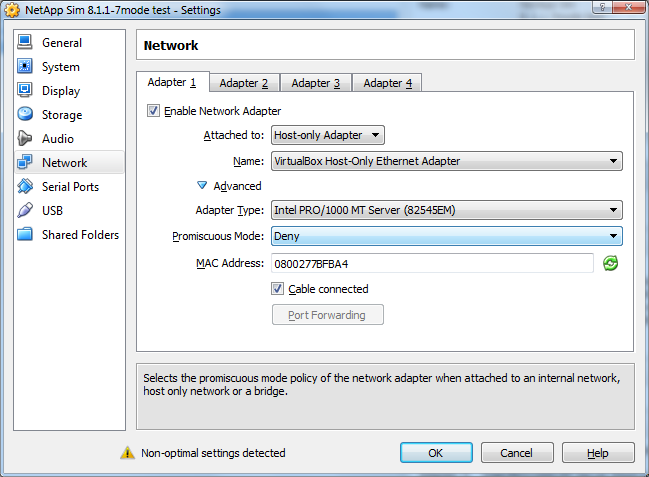
7. On the network page, you can add up to 4 network adapters in any style that you choose - host only, bridged, internal, NAT. This provides a bit more choice than available through VMWare Player. Having some NICs of each type certainly can setup some interesting possibilities for multiple simulators. For each NIC you add, expand the "Advanced" section for the NIC and select "Intel PRO/1000 MT Server (82545EM)" as the adapter type. The Simulator virtual machine only has drivers for this emulated NIC type. A sample NIC setup would look like:
8. The default setup of the VMWare virtual machine attaches a local Windows pipe as a conduit to each of two serial ports - one for the "console" and one for debugging. You can enable serial ports and redirect, but it is not required.
9. On the USB page, uncheck "Enable USB Controller".
10. On the Shared Folders page, no shared folders need be created.
11. Save the virtual machine.
12. Be sure you have 1600MB real free memory to start the guest or it will fail during startup at some point.
13. Start the virtual machine.
14. During the 10 second countdown, click in the VM and press any key that is NOT Enter to stop the boot.
15. Update the environment to not start the VMWare tools with command "setenv bootarg.vm.run_vmtools false"
16. If you are installing a 2nd simulator this is a great time to update the serial number as per the documentation as well.
17. Enter command "boot" to continue with the startup of Data OnTAP.
18. When the "Press Cntrl-C for menu" appears, press Cntrl-C and wait for the boot menu. This first boot can take a little bit to happen depending on your hosting platform.
19. On the boot menu, select option 4 and confirm clearing all disks and deleting all data.
20. The Simulator will restart - let it proceed normally. After restoring a fresh Data OnTAP from the simulated media you will eventually get the prompts for standard setup of a new Filer.
Enjoy!
Solved! See The Solution
- Mark as New
- Bookmark
- Subscribe
- Mute
- Subscribe to RSS Feed
- Permalink
- Report Inappropriate Content
Here's my ovf file for the 832rc1 workstation build with the virtualbox adjustments. Untar the OVA, delete the .mf manifest, and replace the contents of the .ovf with this and it should import. Then connect the NICs to your hostonly and nat networks accordingly and power it up.
<?xml version="1.0" encoding="UTF-8"?>
<!--Generated by VMware ovftool 1.0.0 (build-166674), User: nviet, UTC time: 2015-11-16T15:43:26.043808Z-->
<Envelope vmw:buildId="build-166674" xmlns="http://schemas.dmtf.org/ovf/envelope/1" xmlns:cim="http://schemas.dmtf.org/wbem/wscim/1/common" xmlns:ovf="http://schemas.dmtf.org/ovf/envelope/1" xmlns:rasd="http://schemas.dmtf.org/wbem/wscim/1/cim-schema/2/CIM_ResourceAllocationSettingData" xmlns:vmw="http://www.vmware.com/schema/ovf" xmlns:vssd="http://schemas.dmtf.org/wbem/wscim/1/cim-schema/2/CIM_VirtualSystemSettingData" xmlns:xsi="http://www.w3.org/2001/XMLSchema-instance">
<References>
<File ovf:compression="gzip" ovf:href="vsim-netapp-DOT8.3.2RC1-cm-disk1.vmdk.gz" ovf:id="file1" ovf:size="557577272"/>
<File ovf:compression="gzip" ovf:href="vsim-netapp-DOT8.3.2RC1-cm-disk2.vmdk.gz" ovf:id="file2" ovf:size="605"/>
<File ovf:compression="gzip" ovf:href="vsim-netapp-DOT8.3.2RC1-cm-disk3.vmdk.gz" ovf:id="file3" ovf:size="612"/>
<File ovf:compression="gzip" ovf:href="vsim-netapp-DOT8.3.2RC1-cm-disk4.vmdk.gz" ovf:id="file4" ovf:size="627"/>
</References>
<DiskSection>
<Info>Virtual disk information</Info>
<Disk ovf:allocationUnits="1048576" ovf:capacity="1943" ovf:capacityAllocationUnits="byte * 2^20" ovf:diskId="vmdisk1" ovf:fileRef="file1" ovf:format="http://www.vmware.com/interfaces/specifications/vmdk.html#streamOptimized" ovf:populatedSize="567607296"/>
<Disk ovf:allocationUnits="1048576" ovf:capacity="1542" ovf:capacityAllocationUnits="byte * 2^20" ovf:diskId="vmdisk2" ovf:fileRef="file2" ovf:format="http://www.vmware.com/interfaces/specifications/vmdk.html#streamOptimized" ovf:populatedSize="65536"/>
<Disk ovf:allocationUnits="1048576" ovf:capacity="4865" ovf:capacityAllocationUnits="byte * 2^20" ovf:diskId="vmdisk3" ovf:fileRef="file3" ovf:format="http://www.vmware.com/interfaces/specifications/vmdk.html#streamOptimized" ovf:populatedSize="65536"/>
<Disk ovf:allocationUnits="1048576" ovf:capacity="236231" ovf:capacityAllocationUnits="byte * 2^20" ovf:diskId="vmdisk4" ovf:fileRef="file4" ovf:format="http://www.vmware.com/interfaces/specifications/vmdk.html#streamOptimized" ovf:populatedSize="65536"/>
</DiskSection>
<NetworkSection>
<Info>The list of logical networks</Info>
<Network ovf:name="hostonly">
<Description>The hostonly network</Description>
</Network>
<Network ovf:name="nat">
<Description>The nat network</Description>
</Network>
</NetworkSection>
<VirtualSystem ovf:id="vsim_netapp-DOT8.3.2RC1-cm">
<Info>A virtual machine</Info>
<Name>vsim_netapp-DOT8.3.2RC1-cm</Name>
<OperatingSystemSection ovf:id="78" vmw:osType="freebsd64Guest">
<Info>The kind of installed guest operating system</Info>
</OperatingSystemSection>
<VirtualHardwareSection>
<Info>Virtual hardware requirements</Info>
<System>
<vssd:ElementName>Virtual Hardware Family</vssd:ElementName>
<vssd:InstanceID>0</vssd:InstanceID>
<vssd:VirtualSystemIdentifier>vsim_netapp-DOT8.3.2RC1-cm</vssd:VirtualSystemIdentifier>
<vssd:VirtualSystemType>vmx-07</vssd:VirtualSystemType>
</System>
<Item>
<rasd:AllocationUnits>hertz * 10^6</rasd:AllocationUnits>
<rasd:Description>Number of Virtual CPUs</rasd:Description>
<rasd:ElementName>2 virtual CPU(s)</rasd:ElementName>
<rasd:InstanceID>1</rasd:InstanceID>
<rasd:ResourceType>3</rasd:ResourceType>
<rasd:VirtualQuantity>2</rasd:VirtualQuantity>
</Item>
<Item>
<rasd:AllocationUnits>byte * 2^20</rasd:AllocationUnits>
<rasd:Description>Memory Size</rasd:Description>
<rasd:ElementName>3580MB of memory</rasd:ElementName>
<rasd:InstanceID>2</rasd:InstanceID>
<rasd:ResourceType>4</rasd:ResourceType>
<rasd:VirtualQuantity>3580</rasd:VirtualQuantity>
</Item>
<Item>
<rasd:Address>0</rasd:Address>
<rasd:Description>IDE Controller</rasd:Description>
<rasd:ElementName>ideController0</rasd:ElementName>
<rasd:InstanceID>3</rasd:InstanceID>
<rasd:ResourceType>5</rasd:ResourceType>
</Item>
<Item>
<rasd:Address>1</rasd:Address>
<rasd:Description>IDE Controller</rasd:Description>
<rasd:ElementName>ideController1</rasd:ElementName>
<rasd:InstanceID>4</rasd:InstanceID>
<rasd:ResourceType>5</rasd:ResourceType>
</Item>
<Item>
<rasd:AddressOnParent>0</rasd:AddressOnParent>
<rasd:AutomaticAllocation>false</rasd:AutomaticAllocation>
<rasd:Caption>floppy0</rasd:Caption>
<rasd:Description>Floppy Drive</rasd:Description>
<rasd:ElementName>floppy0</rasd:ElementName>
<rasd:InstanceID>5</rasd:InstanceID>
<rasd:ResourceType>14</rasd:ResourceType>
</Item>
<Item>
<rasd:AddressOnParent>0</rasd:AddressOnParent>
<rasd:ElementName>disk1</rasd:ElementName>
<rasd:HostResource>ovf:/disk/vmdisk1</rasd:HostResource>
<rasd:InstanceID>6</rasd:InstanceID>
<rasd:Parent>3</rasd:Parent>
<rasd:ResourceType>17</rasd:ResourceType>
</Item>
<Item>
<rasd:AddressOnParent>1</rasd:AddressOnParent>
<rasd:ElementName>disk2</rasd:ElementName>
<rasd:HostResource>ovf:/disk/vmdisk2</rasd:HostResource>
<rasd:InstanceID>7</rasd:InstanceID>
<rasd:Parent>3</rasd:Parent>
<rasd:ResourceType>17</rasd:ResourceType>
</Item>
<Item>
<rasd:AddressOnParent>0</rasd:AddressOnParent>
<rasd:ElementName>disk3</rasd:ElementName>
<rasd:HostResource>ovf:/disk/vmdisk3</rasd:HostResource>
<rasd:InstanceID>8</rasd:InstanceID>
<rasd:Parent>4</rasd:Parent>
<rasd:ResourceType>17</rasd:ResourceType>
</Item>
<Item>
<rasd:AddressOnParent>1</rasd:AddressOnParent>
<rasd:ElementName>disk4</rasd:ElementName>
<rasd:HostResource>ovf:/disk/vmdisk4</rasd:HostResource>
<rasd:InstanceID>9</rasd:InstanceID>
<rasd:Parent>4</rasd:Parent>
<rasd:ResourceType>17</rasd:ResourceType>
</Item>
<Item>
<rasd:AddressOnParent>1</rasd:AddressOnParent>
<rasd:AutomaticAllocation>true</rasd:AutomaticAllocation>
<rasd:Connection>hostonly</rasd:Connection>
<rasd:Description>E1000 ethernet adapter on "hostonly"</rasd:Description>
<rasd:ElementName>ethernet0</rasd:ElementName>
<rasd:InstanceID>10</rasd:InstanceID>
<rasd:ResourceSubType>E1000</rasd:ResourceSubType>
<rasd:ResourceType>10</rasd:ResourceType>
</Item>
<Item>
<rasd:AddressOnParent>2</rasd:AddressOnParent>
<rasd:AutomaticAllocation>true</rasd:AutomaticAllocation>
<rasd:Connection>hostonly</rasd:Connection>
<rasd:Description>E1000 ethernet adapter on "hostonly"</rasd:Description>
<rasd:ElementName>ethernet1</rasd:ElementName>
<rasd:InstanceID>11</rasd:InstanceID>
<rasd:ResourceSubType>E1000</rasd:ResourceSubType>
<rasd:ResourceType>10</rasd:ResourceType>
</Item>
<Item>
<rasd:AddressOnParent>3</rasd:AddressOnParent>
<rasd:AutomaticAllocation>true</rasd:AutomaticAllocation>
<rasd:Connection>nat</rasd:Connection>
<rasd:Description>E1000 ethernet adapter on "nat"</rasd:Description>
<rasd:ElementName>ethernet2</rasd:ElementName>
<rasd:InstanceID>12</rasd:InstanceID>
<rasd:ResourceSubType>E1000</rasd:ResourceSubType>
<rasd:ResourceType>10</rasd:ResourceType>
</Item>
<Item>
<rasd:AddressOnParent>4</rasd:AddressOnParent>
<rasd:AutomaticAllocation>true</rasd:AutomaticAllocation>
<rasd:Connection>nat</rasd:Connection>
<rasd:Description>E1000 ethernet adapter on "nat"</rasd:Description>
<rasd:ElementName>ethernet3</rasd:ElementName>
<rasd:InstanceID>13</rasd:InstanceID>
<rasd:ResourceSubType>E1000</rasd:ResourceSubType>
<rasd:ResourceType>10</rasd:ResourceType>
</Item>
</VirtualHardwareSection>
</VirtualSystem>
</Envelope>
- Mark as New
- Bookmark
- Subscribe
- Mute
- Subscribe to RSS Feed
- Permalink
- Report Inappropriate Content
Hien -
You're on the right track. Don't use "Host Only" network settings for the NICs. In VBox that means the VM can only connect via the network to the underlying host, but not to each other which is needed for the cluster interfaces. NAT works well - in fact almost anything other than "Host Only" can be made to work.
My personal preference for VBox, if you want to keep all presence off "real" networksm is to create a virtual private VM only network in VBox and assign the cluster interfaces for both nodes to that named network when doing a cluster pair. Then your other interfaces can still be host only if all other communication is only coming from the host.
Hope this helps.
Bob Greenwald
Lead Storage Engineer | Consilio LLC
NCIE SAN Clustered, Data Protection
Kudos and accepted solutions are always appreciated.
- Mark as New
- Bookmark
- Subscribe
- Mute
- Subscribe to RSS Feed
- Permalink
- Report Inappropriate Content
- Mark as New
- Bookmark
- Subscribe
- Mute
- Subscribe to RSS Feed
- Permalink
- Report Inappropriate Content
Ah, I see. Its a tale of two disk models.
The simulators prior to 8.1.1 used the "classic" system diskmodel. It had one disk with all the slices required for the sim and an optional 2nd disk for just the cf card. The screenshot you posted is of the 2 disk "quickload" variant.
From 8.1.1 onward, the "standard" system diskmodel with 4 virtual disks is used. The 8.1 you downloaded still has the classic structure, so the other disks are not present.
In the two disk variant, the DataONTAP.vmdk goes on IDE0:0 and the DataONTAP-cf.vmdk goes on IDE0:1. I haven't tried 8.1 in vbox so let us know if it works.
