Stay connected during the transition - Join our Discord community today.
Simulator Discussions
- Home
- :
- Developer Network
- :
- Simulator Discussions
- :
- Re: Simulate ONTAP 8.1.1 withVirtualBox
Simulator Discussions
- Subscribe to RSS Feed
- Mark Topic as New
- Mark Topic as Read
- Float this Topic for Current User
- Bookmark
- Subscribe
- Mute
- Printer Friendly Page
- Mark as New
- Bookmark
- Subscribe
- Mute
- Subscribe to RSS Feed
- Permalink
- Report Inappropriate Content
There have been a small number of posts both here and in the support community about the change between the 7.3 family of OnTap simulators and those for 8.1.1. The delivery model changed from being one where you install the simulator on a Linux system (easily setup on any virtualization platform you have) to the model in 8.1.1 Simulator where you download a full virtual machine image designed for use in a VMWare environment only.
Many people will have access to one of the paid options (VMWare Workstation/Fusions/ESX) or can use the free VMWare Player on Windows. But, for those that need alternatives such as on a Linux or Solaris host platform or something free on a Mac, here are instructions to setup 8.1.1 Simulator on VirtualBox.
Disclaimer: to date I have only tested this on a single Windows platform. Specifically, I tested this on a 32 bit Windows 7 host (but on 64 bit capable hardware). Basic setup and general operations seem normally functional, though I have not delved into all the possibilities that OnTap offers. The 7-mode simulator is the one on which I did most checkouts since this is what I need to make available to other team members where I work. I have done minimal setup only on cluster mode. None of this is technically supported by NetApp, and your mileage may vary.
Test environment: Dell laptop, 3GB RAM running Windows 7 SP1 32 bit; VirtualBox 4.2.4r81684; Simulate OnTap 8.1.1. As per the VirtualBox documentation, you will need a 64 bit processor with virtualization enhancements enabled even if the host OS is 32 bit.
Setup (assumes basic familiarity with VirtualBox)
1. Download and install VirtualBox. I just used defaults for setup.
2. Download the 8.1.1 simulator. Extract the files somewhere that you want them to be.
3. Create a new Virtual Machine with OS type BSD, version FreeBSD (64 bit). Memory required is 1600MB. Don't select a virtual hard drive now, we need to select a bunch later. Save the new machine.
4. Open the Settings for the new VM. On the System page, Processor tab, set CPU to 2
5. On the Storage path, delete the CDROM from the IDE controller. Then, add 4 virtual hard disks to the controller. For each disk, you will choose an existing disk. The disks you will add, in order, are "DataONTAP.vmdk", "DataONTAP-var.vmdk", "DataONTAP-nvram.vmdk", and "DataONTAP-sim.vmdk". Finally, add a Floppy controller with a single, empty floppy drive. When complete, the storage setup for your new virtual machine should look like:

6. On the audio page, uncheck "Enable Audio".
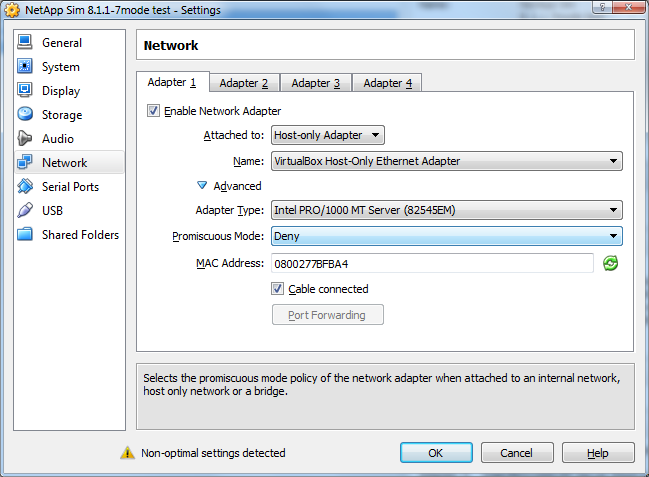
7. On the network page, you can add up to 4 network adapters in any style that you choose - host only, bridged, internal, NAT. This provides a bit more choice than available through VMWare Player. Having some NICs of each type certainly can setup some interesting possibilities for multiple simulators. For each NIC you add, expand the "Advanced" section for the NIC and select "Intel PRO/1000 MT Server (82545EM)" as the adapter type. The Simulator virtual machine only has drivers for this emulated NIC type. A sample NIC setup would look like:
8. The default setup of the VMWare virtual machine attaches a local Windows pipe as a conduit to each of two serial ports - one for the "console" and one for debugging. You can enable serial ports and redirect, but it is not required.
9. On the USB page, uncheck "Enable USB Controller".
10. On the Shared Folders page, no shared folders need be created.
11. Save the virtual machine.
12. Be sure you have 1600MB real free memory to start the guest or it will fail during startup at some point.
13. Start the virtual machine.
14. During the 10 second countdown, click in the VM and press any key that is NOT Enter to stop the boot.
15. Update the environment to not start the VMWare tools with command "setenv bootarg.vm.run_vmtools false"
16. If you are installing a 2nd simulator this is a great time to update the serial number as per the documentation as well.
17. Enter command "boot" to continue with the startup of Data OnTAP.
18. When the "Press Cntrl-C for menu" appears, press Cntrl-C and wait for the boot menu. This first boot can take a little bit to happen depending on your hosting platform.
19. On the boot menu, select option 4 and confirm clearing all disks and deleting all data.
20. The Simulator will restart - let it proceed normally. After restoring a fresh Data OnTAP from the simulated media you will eventually get the prompts for standard setup of a new Filer.
Enjoy!
Solved! See The Solution
- Mark as New
- Bookmark
- Subscribe
- Mute
- Subscribe to RSS Feed
- Permalink
- Report Inappropriate Content
Here's my ovf file for the 832rc1 workstation build with the virtualbox adjustments. Untar the OVA, delete the .mf manifest, and replace the contents of the .ovf with this and it should import. Then connect the NICs to your hostonly and nat networks accordingly and power it up.
<?xml version="1.0" encoding="UTF-8"?>
<!--Generated by VMware ovftool 1.0.0 (build-166674), User: nviet, UTC time: 2015-11-16T15:43:26.043808Z-->
<Envelope vmw:buildId="build-166674" xmlns="http://schemas.dmtf.org/ovf/envelope/1" xmlns:cim="http://schemas.dmtf.org/wbem/wscim/1/common" xmlns:ovf="http://schemas.dmtf.org/ovf/envelope/1" xmlns:rasd="http://schemas.dmtf.org/wbem/wscim/1/cim-schema/2/CIM_ResourceAllocationSettingData" xmlns:vmw="http://www.vmware.com/schema/ovf" xmlns:vssd="http://schemas.dmtf.org/wbem/wscim/1/cim-schema/2/CIM_VirtualSystemSettingData" xmlns:xsi="http://www.w3.org/2001/XMLSchema-instance">
<References>
<File ovf:compression="gzip" ovf:href="vsim-netapp-DOT8.3.2RC1-cm-disk1.vmdk.gz" ovf:id="file1" ovf:size="557577272"/>
<File ovf:compression="gzip" ovf:href="vsim-netapp-DOT8.3.2RC1-cm-disk2.vmdk.gz" ovf:id="file2" ovf:size="605"/>
<File ovf:compression="gzip" ovf:href="vsim-netapp-DOT8.3.2RC1-cm-disk3.vmdk.gz" ovf:id="file3" ovf:size="612"/>
<File ovf:compression="gzip" ovf:href="vsim-netapp-DOT8.3.2RC1-cm-disk4.vmdk.gz" ovf:id="file4" ovf:size="627"/>
</References>
<DiskSection>
<Info>Virtual disk information</Info>
<Disk ovf:allocationUnits="1048576" ovf:capacity="1943" ovf:capacityAllocationUnits="byte * 2^20" ovf:diskId="vmdisk1" ovf:fileRef="file1" ovf:format="http://www.vmware.com/interfaces/specifications/vmdk.html#streamOptimized" ovf:populatedSize="567607296"/>
<Disk ovf:allocationUnits="1048576" ovf:capacity="1542" ovf:capacityAllocationUnits="byte * 2^20" ovf:diskId="vmdisk2" ovf:fileRef="file2" ovf:format="http://www.vmware.com/interfaces/specifications/vmdk.html#streamOptimized" ovf:populatedSize="65536"/>
<Disk ovf:allocationUnits="1048576" ovf:capacity="4865" ovf:capacityAllocationUnits="byte * 2^20" ovf:diskId="vmdisk3" ovf:fileRef="file3" ovf:format="http://www.vmware.com/interfaces/specifications/vmdk.html#streamOptimized" ovf:populatedSize="65536"/>
<Disk ovf:allocationUnits="1048576" ovf:capacity="236231" ovf:capacityAllocationUnits="byte * 2^20" ovf:diskId="vmdisk4" ovf:fileRef="file4" ovf:format="http://www.vmware.com/interfaces/specifications/vmdk.html#streamOptimized" ovf:populatedSize="65536"/>
</DiskSection>
<NetworkSection>
<Info>The list of logical networks</Info>
<Network ovf:name="hostonly">
<Description>The hostonly network</Description>
</Network>
<Network ovf:name="nat">
<Description>The nat network</Description>
</Network>
</NetworkSection>
<VirtualSystem ovf:id="vsim_netapp-DOT8.3.2RC1-cm">
<Info>A virtual machine</Info>
<Name>vsim_netapp-DOT8.3.2RC1-cm</Name>
<OperatingSystemSection ovf:id="78" vmw:osType="freebsd64Guest">
<Info>The kind of installed guest operating system</Info>
</OperatingSystemSection>
<VirtualHardwareSection>
<Info>Virtual hardware requirements</Info>
<System>
<vssd:ElementName>Virtual Hardware Family</vssd:ElementName>
<vssd:InstanceID>0</vssd:InstanceID>
<vssd:VirtualSystemIdentifier>vsim_netapp-DOT8.3.2RC1-cm</vssd:VirtualSystemIdentifier>
<vssd:VirtualSystemType>vmx-07</vssd:VirtualSystemType>
</System>
<Item>
<rasd:AllocationUnits>hertz * 10^6</rasd:AllocationUnits>
<rasd:Description>Number of Virtual CPUs</rasd:Description>
<rasd:ElementName>2 virtual CPU(s)</rasd:ElementName>
<rasd:InstanceID>1</rasd:InstanceID>
<rasd:ResourceType>3</rasd:ResourceType>
<rasd:VirtualQuantity>2</rasd:VirtualQuantity>
</Item>
<Item>
<rasd:AllocationUnits>byte * 2^20</rasd:AllocationUnits>
<rasd:Description>Memory Size</rasd:Description>
<rasd:ElementName>3580MB of memory</rasd:ElementName>
<rasd:InstanceID>2</rasd:InstanceID>
<rasd:ResourceType>4</rasd:ResourceType>
<rasd:VirtualQuantity>3580</rasd:VirtualQuantity>
</Item>
<Item>
<rasd:Address>0</rasd:Address>
<rasd:Description>IDE Controller</rasd:Description>
<rasd:ElementName>ideController0</rasd:ElementName>
<rasd:InstanceID>3</rasd:InstanceID>
<rasd:ResourceType>5</rasd:ResourceType>
</Item>
<Item>
<rasd:Address>1</rasd:Address>
<rasd:Description>IDE Controller</rasd:Description>
<rasd:ElementName>ideController1</rasd:ElementName>
<rasd:InstanceID>4</rasd:InstanceID>
<rasd:ResourceType>5</rasd:ResourceType>
</Item>
<Item>
<rasd:AddressOnParent>0</rasd:AddressOnParent>
<rasd:AutomaticAllocation>false</rasd:AutomaticAllocation>
<rasd:Caption>floppy0</rasd:Caption>
<rasd:Description>Floppy Drive</rasd:Description>
<rasd:ElementName>floppy0</rasd:ElementName>
<rasd:InstanceID>5</rasd:InstanceID>
<rasd:ResourceType>14</rasd:ResourceType>
</Item>
<Item>
<rasd:AddressOnParent>0</rasd:AddressOnParent>
<rasd:ElementName>disk1</rasd:ElementName>
<rasd:HostResource>ovf:/disk/vmdisk1</rasd:HostResource>
<rasd:InstanceID>6</rasd:InstanceID>
<rasd:Parent>3</rasd:Parent>
<rasd:ResourceType>17</rasd:ResourceType>
</Item>
<Item>
<rasd:AddressOnParent>1</rasd:AddressOnParent>
<rasd:ElementName>disk2</rasd:ElementName>
<rasd:HostResource>ovf:/disk/vmdisk2</rasd:HostResource>
<rasd:InstanceID>7</rasd:InstanceID>
<rasd:Parent>3</rasd:Parent>
<rasd:ResourceType>17</rasd:ResourceType>
</Item>
<Item>
<rasd:AddressOnParent>0</rasd:AddressOnParent>
<rasd:ElementName>disk3</rasd:ElementName>
<rasd:HostResource>ovf:/disk/vmdisk3</rasd:HostResource>
<rasd:InstanceID>8</rasd:InstanceID>
<rasd:Parent>4</rasd:Parent>
<rasd:ResourceType>17</rasd:ResourceType>
</Item>
<Item>
<rasd:AddressOnParent>1</rasd:AddressOnParent>
<rasd:ElementName>disk4</rasd:ElementName>
<rasd:HostResource>ovf:/disk/vmdisk4</rasd:HostResource>
<rasd:InstanceID>9</rasd:InstanceID>
<rasd:Parent>4</rasd:Parent>
<rasd:ResourceType>17</rasd:ResourceType>
</Item>
<Item>
<rasd:AddressOnParent>1</rasd:AddressOnParent>
<rasd:AutomaticAllocation>true</rasd:AutomaticAllocation>
<rasd:Connection>hostonly</rasd:Connection>
<rasd:Description>E1000 ethernet adapter on "hostonly"</rasd:Description>
<rasd:ElementName>ethernet0</rasd:ElementName>
<rasd:InstanceID>10</rasd:InstanceID>
<rasd:ResourceSubType>E1000</rasd:ResourceSubType>
<rasd:ResourceType>10</rasd:ResourceType>
</Item>
<Item>
<rasd:AddressOnParent>2</rasd:AddressOnParent>
<rasd:AutomaticAllocation>true</rasd:AutomaticAllocation>
<rasd:Connection>hostonly</rasd:Connection>
<rasd:Description>E1000 ethernet adapter on "hostonly"</rasd:Description>
<rasd:ElementName>ethernet1</rasd:ElementName>
<rasd:InstanceID>11</rasd:InstanceID>
<rasd:ResourceSubType>E1000</rasd:ResourceSubType>
<rasd:ResourceType>10</rasd:ResourceType>
</Item>
<Item>
<rasd:AddressOnParent>3</rasd:AddressOnParent>
<rasd:AutomaticAllocation>true</rasd:AutomaticAllocation>
<rasd:Connection>nat</rasd:Connection>
<rasd:Description>E1000 ethernet adapter on "nat"</rasd:Description>
<rasd:ElementName>ethernet2</rasd:ElementName>
<rasd:InstanceID>12</rasd:InstanceID>
<rasd:ResourceSubType>E1000</rasd:ResourceSubType>
<rasd:ResourceType>10</rasd:ResourceType>
</Item>
<Item>
<rasd:AddressOnParent>4</rasd:AddressOnParent>
<rasd:AutomaticAllocation>true</rasd:AutomaticAllocation>
<rasd:Connection>nat</rasd:Connection>
<rasd:Description>E1000 ethernet adapter on "nat"</rasd:Description>
<rasd:ElementName>ethernet3</rasd:ElementName>
<rasd:InstanceID>13</rasd:InstanceID>
<rasd:ResourceSubType>E1000</rasd:ResourceSubType>
<rasd:ResourceType>10</rasd:ResourceType>
</Item>
</VirtualHardwareSection>
</VirtualSystem>
</Envelope>
- Mark as New
- Bookmark
- Subscribe
- Mute
- Subscribe to RSS Feed
- Permalink
- Report Inappropriate Content
Very interesting work.
Old versions can be useful from time to time. Here's 8.1.1:
http://mysupport.netapp.com/cgi-bin/simulatorlic8.cgi/download/tools/simulator/ontap/8.1.1/vsim-DOT811-7m.tgz
http://mysupport.netapp.com/cgi-bin/simulatorlic8.cgi/download/tools/simulator/ontap/8.1.1/vsim-DOT811-cm.tgz
http://mysupport.netapp.com/cgi-bin/simulatorlic8.cgi/download/tools/simulator/ontap/8.1.1/vsim-DOT811-7m-esx.tgz
http://mysupport.netapp.com/cgi-bin/simulatorlic8.cgi/download/tools/simulator/ontap/8.1.1/vsim-DOT811-cm-esx.tgz
- Mark as New
- Bookmark
- Subscribe
- Mute
- Subscribe to RSS Feed
- Permalink
- Report Inappropriate Content
Just used these instructions to set up an ONTAP 8.2 simulator on VirtualBox 9 and it worked perfectly. Thanks for the great proecedural notes!
- Mark as New
- Bookmark
- Subscribe
- Mute
- Subscribe to RSS Feed
- Permalink
- Report Inappropriate Content
Step 15. You are not clear as to where to enter this option. You did not explain that option at all.
I believe you mean to say open the env file located vsim_netapp-cm\cfcard\env. Below is an example where I installed
my files:
C:\Users\pbruce\Documents\Vendors\NetApp\Software\Simulator\vsim_netapp-cm\cfcard\env directory and
I also am running into the boot no boot issue. What wrong is supposed to be able to put a ? to see list of command available
and it does not seem to work.
For those of you having issues finding the files. This is where I put mine and you can see all the files are there.
Directory of C:\Users\pbruce\Documents\Vendors\NetApp\Software\Simulator\vsim_netapp-cm
11/17/2014 05:51 AM 2,037,383,168 DataONTAP-flat.vmdk
11/17/2014 05:51 AM 5,101,322,240 DataONTAP-nvram-flat.vmdk
02/12/2015 10:05 PM 745 DataONTAP-nvram.vmdk
02/15/2015 10:08 AM 327,680 DataONTAP-s001.vmdk
02/15/2015 10:08 AM 327,680 DataONTAP-s002.vmdk
02/15/2015 10:08 AM 327,680 DataONTAP-s003.vmdk
02/15/2015 10:08 AM 327,680 DataONTAP-s004.vmdk
02/15/2015 10:08 AM 327,680 DataONTAP-s005.vmdk
02/15/2015 10:08 AM 327,680 DataONTAP-s006.vmdk
02/15/2015 10:08 AM 327,680 DataONTAP-s007.vmdk
02/15/2015 10:08 AM 327,680 DataONTAP-s008.vmdk
02/15/2015 10:08 AM 327,680 DataONTAP-s009.vmdk
02/15/2015 10:08 AM 327,680 DataONTAP-s010.vmdk
02/15/2015 10:08 AM 327,680 DataONTAP-s011.vmdk
02/15/2015 10:08 AM 327,680 DataONTAP-s012.vmdk
02/15/2015 10:08 AM 327,680 DataONTAP-s013.vmdk
02/15/2015 10:08 AM 327,680 DataONTAP-s014.vmdk
02/15/2015 10:08 AM 327,680 DataONTAP-s015.vmdk
02/15/2015 10:08 AM 327,680 DataONTAP-s016.vmdk
02/15/2015 10:08 AM 327,680 DataONTAP-s017.vmdk
02/15/2015 10:08 AM 327,680 DataONTAP-s018.vmdk
02/15/2015 10:08 AM 327,680 DataONTAP-s019.vmdk
02/15/2015 10:08 AM 327,680 DataONTAP-s020.vmdk
02/15/2015 10:08 AM 327,680 DataONTAP-s021.vmdk
02/15/2015 10:08 AM 327,680 DataONTAP-s022.vmdk
02/15/2015 10:08 AM 327,680 DataONTAP-s023.vmdk
02/15/2015 10:08 AM 327,680 DataONTAP-s024.vmdk
02/15/2015 10:08 AM 327,680 DataONTAP-s025.vmdk
02/15/2015 10:08 AM 327,680 DataONTAP-s026.vmdk
02/15/2015 10:08 AM 327,680 DataONTAP-s027.vmdk
02/15/2015 10:08 AM 327,680 DataONTAP-s028.vmdk
02/15/2015 10:08 AM 327,680 DataONTAP-s029.vmdk
02/15/2015 10:08 AM 327,680 DataONTAP-s030.vmdk
02/15/2015 10:08 AM 327,680 DataONTAP-s031.vmdk
02/15/2015 10:08 AM 327,680 DataONTAP-s032.vmdk
02/15/2015 10:08 AM 327,680 DataONTAP-s033.vmdk
02/15/2015 10:08 AM 327,680 DataONTAP-s034.vmdk
02/15/2015 10:08 AM 327,680 DataONTAP-s035.vmdk
02/15/2015 10:08 AM 327,680 DataONTAP-s036.vmdk
02/15/2015 10:08 AM 327,680 DataONTAP-s037.vmdk
02/15/2015 10:08 AM 327,680 DataONTAP-s038.vmdk
02/15/2015 10:08 AM 327,680 DataONTAP-s039.vmdk
02/15/2015 10:08 AM 327,680 DataONTAP-s040.vmdk
02/15/2015 10:08 AM 327,680 DataONTAP-s041.vmdk
02/15/2015 10:08 AM 327,680 DataONTAP-s042.vmdk
02/15/2015 10:08 AM 327,680 DataONTAP-s043.vmdk
02/15/2015 10:08 AM 327,680 DataONTAP-s044.vmdk
02/15/2015 10:08 AM 327,680 DataONTAP-s045.vmdk
02/15/2015 10:08 AM 327,680 DataONTAP-s046.vmdk
02/15/2015 10:08 AM 327,680 DataONTAP-s047.vmdk
02/15/2015 10:08 AM 327,680 DataONTAP-s048.vmdk
02/15/2015 10:08 AM 327,680 DataONTAP-s049.vmdk
02/15/2015 10:08 AM 327,680 DataONTAP-s050.vmdk
02/15/2015 10:08 AM 327,680 DataONTAP-s051.vmdk
02/15/2015 10:08 AM 327,680 DataONTAP-s052.vmdk
02/15/2015 10:08 AM 327,680 DataONTAP-s053.vmdk
02/15/2015 10:08 AM 327,680 DataONTAP-s054.vmdk
02/15/2015 10:08 AM 327,680 DataONTAP-s055.vmdk
02/15/2015 10:08 AM 327,680 DataONTAP-s056.vmdk
02/15/2015 10:08 AM 327,680 DataONTAP-s057.vmdk
02/15/2015 10:08 AM 327,680 DataONTAP-s058.vmdk
02/15/2015 10:08 AM 327,680 DataONTAP-s059.vmdk
02/15/2015 10:08 AM 327,680 DataONTAP-s060.vmdk
02/15/2015 10:08 AM 327,680 DataONTAP-s061.vmdk
02/15/2015 10:08 AM 327,680 DataONTAP-s062.vmdk
02/15/2015 10:08 AM 327,680 DataONTAP-s063.vmdk
02/15/2015 10:08 AM 327,680 DataONTAP-s064.vmdk
02/15/2015 10:08 AM 327,680 DataONTAP-s065.vmdk
02/15/2015 10:08 AM 327,680 DataONTAP-s066.vmdk
02/15/2015 10:08 AM 327,680 DataONTAP-s067.vmdk
02/15/2015 10:08 AM 327,680 DataONTAP-s068.vmdk
02/15/2015 10:08 AM 327,680 DataONTAP-s069.vmdk
02/15/2015 10:08 AM 327,680 DataONTAP-s070.vmdk
02/15/2015 10:08 AM 327,680 DataONTAP-s071.vmdk
02/15/2015 10:08 AM 327,680 DataONTAP-s072.vmdk
02/15/2015 10:08 AM 327,680 DataONTAP-s073.vmdk
02/15/2015 10:08 AM 327,680 DataONTAP-s074.vmdk
02/15/2015 10:08 AM 327,680 DataONTAP-s075.vmdk
02/15/2015 10:08 AM 327,680 DataONTAP-s076.vmdk
02/15/2015 10:08 AM 327,680 DataONTAP-s077.vmdk
02/15/2015 10:08 AM 327,680 DataONTAP-s078.vmdk
02/15/2015 10:08 AM 327,680 DataONTAP-s079.vmdk
02/15/2015 10:08 AM 327,680 DataONTAP-s080.vmdk
02/15/2015 10:08 AM 327,680 DataONTAP-s081.vmdk
02/15/2015 10:08 AM 327,680 DataONTAP-s082.vmdk
02/15/2015 10:08 AM 327,680 DataONTAP-s083.vmdk
02/15/2015 10:08 AM 327,680 DataONTAP-s084.vmdk
02/15/2015 10:08 AM 327,680 DataONTAP-s085.vmdk
02/15/2015 10:08 AM 327,680 DataONTAP-s086.vmdk
02/15/2015 10:08 AM 327,680 DataONTAP-s087.vmdk
02/15/2015 10:08 AM 327,680 DataONTAP-s088.vmdk
02/15/2015 10:08 AM 327,680 DataONTAP-s089.vmdk
02/15/2015 10:08 AM 327,680 DataONTAP-s090.vmdk
02/15/2015 10:08 AM 327,680 DataONTAP-s091.vmdk
02/15/2015 10:08 AM 327,680 DataONTAP-s092.vmdk
02/15/2015 10:08 AM 327,680 DataONTAP-s093.vmdk
02/15/2015 10:08 AM 327,680 DataONTAP-s094.vmdk
02/15/2015 10:08 AM 327,680 DataONTAP-s095.vmdk
02/15/2015 10:08 AM 327,680 DataONTAP-s096.vmdk
02/15/2015 10:08 AM 327,680 DataONTAP-s097.vmdk
02/15/2015 10:08 AM 327,680 DataONTAP-s098.vmdk
02/15/2015 10:08 AM 327,680 DataONTAP-s099.vmdk
02/15/2015 10:08 AM 327,680 DataONTAP-s100.vmdk
02/15/2015 10:08 AM 327,680 DataONTAP-s101.vmdk
02/15/2015 10:08 AM 327,680 DataONTAP-s102.vmdk
02/15/2015 10:08 AM 327,680 DataONTAP-s103.vmdk
02/15/2015 10:08 AM 327,680 DataONTAP-s104.vmdk
02/15/2015 10:08 AM 327,680 DataONTAP-s105.vmdk
02/15/2015 10:08 AM 327,680 DataONTAP-s106.vmdk
02/15/2015 10:08 AM 327,680 DataONTAP-s107.vmdk
02/15/2015 10:08 AM 327,680 DataONTAP-s108.vmdk
02/15/2015 10:08 AM 327,680 DataONTAP-s109.vmdk
02/15/2015 10:08 AM 327,680 DataONTAP-s110.vmdk
02/15/2015 10:08 AM 327,680 DataONTAP-s111.vmdk
02/15/2015 10:08 AM 327,680 DataONTAP-s112.vmdk
02/15/2015 10:08 AM 327,680 DataONTAP-s113.vmdk
02/15/2015 10:08 AM 327,680 DataONTAP-s114.vmdk
02/15/2015 10:08 AM 327,680 DataONTAP-s115.vmdk
02/15/2015 10:08 AM 327,680 DataONTAP-s116.vmdk
02/15/2015 10:08 AM 327,680 DataONTAP-s117.vmdk
02/15/2015 10:08 AM 327,680 DataONTAP-s118.vmdk
02/15/2015 10:08 AM 327,680 DataONTAP-s119.vmdk
02/15/2015 10:08 AM 327,680 DataONTAP-s120.vmdk
02/15/2015 10:08 AM 327,680 DataONTAP-s121.vmdk
02/15/2015 10:08 AM 327,680 DataONTAP-s122.vmdk
02/15/2015 10:08 AM 327,680 DataONTAP-s123.vmdk
02/15/2015 10:08 AM 327,680 DataONTAP-s124.vmdk
02/15/2015 10:08 AM 327,680 DataONTAP-s125.vmdk
02/15/2015 10:08 AM 65,536 DataONTAP-s126.vmdk
02/12/2015 10:05 PM 5,656 DataONTAP-sim.vmdk
11/17/2014 05:51 AM 1,616,904,192 DataONTAP-var-flat.vmdk
02/12/2015 10:05 PM 743 DataONTAP-var.vmdk
02/12/2015 10:05 PM 739 DataONTAP.vmdk
133 File(s) 8,796,643,019 bytes
0 Dir(s) 356,529,795,072 bytes free
The person who wrote the guys should had paid a littel attention to detail. While good for the most part we seem to be missing something else.
I like to get past the boot issue.
- Mark as New
- Bookmark
- Subscribe
- Mute
- Subscribe to RSS Feed
- Permalink
- Report Inappropriate Content
Found that adding the floopy with empty data solved the issue so far.
Still not setting up.
- Mark as New
- Bookmark
- Subscribe
- Mute
- Subscribe to RSS Feed
- Permalink
- Report Inappropriate Content
Hi,
I did the whole thing more then ones with 8.3 and 8.2.
The problem I encounter is that at the end it can't find setup due by a missing mboot disk.
Regards
- Mark as New
- Bookmark
- Subscribe
- Mute
- Subscribe to RSS Feed
- Permalink
- Report Inappropriate Content
Yes, it's always the same thing......RTFM.
I used the wrong NIC , the standard one mt 1000 desktop instead of server.
boot disk is found now, setup is running.
Regards
Chiel
- Mark as New
- Bookmark
- Subscribe
- Mute
- Subscribe to RSS Feed
- Permalink
- Report Inappropriate Content
Has anyone been able to get 8.3.2RC1 to run in VirtualBox?
- Mark as New
- Bookmark
- Subscribe
- Mute
- Subscribe to RSS Feed
- Permalink
- Report Inappropriate Content
Sure. Took a slightly different approach. I fixed the ovf so it would import correctly and added the floppy device to the ovf xml. Then I just imported the appliance, connected the nics to the appropriate networks and started it up.
I did have some trouble getting past a memory related panic at start up. There is no apparent way to control the placement of the PCI hole, so it took some experimentation to find ram sizing that would work. 5gb did not work, 6gb did work. 4gb did not, 3gb did. I settled on 3560MB, and updated my ovf to make that the default on future imports.
- Mark as New
- Bookmark
- Subscribe
- Mute
- Subscribe to RSS Feed
- Permalink
- Report Inappropriate Content
I've been experimenting with writing OVF descriptors for the various vsims, and the results are encouraging. With an appropriate OVF descriptor added to the TGZ archives they import cleanly into virtualbox, fusion, and workstation. Virtualbox on windows seems to be the exception. It can't deal with compressed vmdks at all, and even when it imports the vmdks it leaves them disconnected from the IDE controller. In windows it will import, but you have to go back and re-attach the hard drives.
Here is a sample ovf envelope. It plays a little lose with the dmtf spec, and I had to make some educated guesses on the ovf:format values, but it seems to work accross the various 8.2.x archives. Just extract the vsim tgz file, drop this in along side all the .vmdk files, and import it into virtual box.
vsim-82x.ovf
<?xml version="1.0" encoding="UTF-8"?>
<!--Hand crafted ovf descriptor for the vsim tgz archives for use in virtualbox-->
<Envelope vmw:buildId="build-166674" xmlns="http://schemas.dmtf.org/ovf/envelope/1" xmlns:cim="http://schemas.dmtf.org/wbem/wscim/1/common" xmlns:ovf="http://schemas.dmtf.org/ovf/envelope/1" xmlns:rasd="http://schemas.dmtf.org/wbem/wscim/1/cim-schema/2/CIM_ResourceAllocationSettingData" xmlns:vmw="http://www.vmware.com/schema/ovf" xmlns:vssd="http://schemas.dmtf.org/wbem/wscim/1/cim-schema/2/CIM_VirtualSystemSettingData" xmlns:xsi="http://www.w3.org/2001/XMLSchema-instance">
<References>
<File ovf:href="DataONTAP.vmdk" ovf:id="file1"/>
<File ovf:href="DataONTAP-var.vmdk" ovf:id="file2"/>
<File ovf:href="DataONTAP-nvram.vmdk" ovf:id="file3"/>
<File ovf:href="DataONTAP-sim.vmdk" ovf:id="file4"/>
</References>
<DiskSection>
<Info>Virtual disk information</Info>
<Disk ovf:capacity="1943" ovf:capacityAllocationUnits="byte * 2^20" ovf:diskId="vmdisk1" ovf:fileRef="file1" ovf:format="http://www.vmware.com/interfaces/specifications/vmdk.html#thick"/>
<Disk ovf:capacity="1542" ovf:capacityAllocationUnits="byte * 2^20" ovf:diskId="vmdisk2" ovf:fileRef="file2" ovf:format="http://www.vmware.com/interfaces/specifications/vmdk.html#thick"/>
<Disk ovf:capacity="5122" ovf:capacityAllocationUnits="byte * 2^20" ovf:diskId="vmdisk3" ovf:fileRef="file3" ovf:format="http://www.vmware.com/interfaces/specifications/vmdk.html#thick"/>
<Disk ovf:capacity="250" ovf:capacityAllocationUnits="byte * 2^30" ovf:diskId="vmdisk4" ovf:fileRef="file4" ovf:format="http://www.vmware.com/interfaces/specifications/vmdk.html#twoGbMaxExtentSparse"/>
</DiskSection>
<NetworkSection>
<Info>The list of logical networks</Info>
<Network ovf:name="hostonly">
<Description>The hostonly network</Description>
</Network>
<Network ovf:name="nat">
<Description>The nat network</Description>
</Network>
</NetworkSection>
<VirtualSystem ovf:id="vsim_netapp-DOT8.2.x">
<Info>A virtual machine</Info>
<Name>vsim_netapp-DOT8.2.x</Name>
<OperatingSystemSection ovf:id="78" vmw:osType="freebsd64Guest">
<Info>The kind of installed guest operating system</Info>
</OperatingSystemSection>
<VirtualHardwareSection>
<Info>Virtual hardware requirements</Info>
<System>
<vssd:ElementName>Virtual Hardware Family</vssd:ElementName>
<vssd:InstanceID>0</vssd:InstanceID>
<vssd:VirtualSystemIdentifier>vsim_netapp-DOT8.2.x</vssd:VirtualSystemIdentifier>
<vssd:VirtualSystemType>vmx-07</vssd:VirtualSystemType>
</System>
<Item>
<rasd:AllocationUnits>hertz * 10^6</rasd:AllocationUnits>
<rasd:Description>Number of Virtual CPUs</rasd:Description>
<rasd:ElementName>2 virtual CPU(s)</rasd:ElementName>
<rasd:InstanceID>1</rasd:InstanceID>
<rasd:ResourceType>3</rasd:ResourceType>
<rasd:VirtualQuantity>2</rasd:VirtualQuantity>
</Item>
<Item>
<rasd:AllocationUnits>byte * 2^20</rasd:AllocationUnits>
<rasd:Description>Memory Size</rasd:Description>
<rasd:ElementName>1600MB of memory</rasd:ElementName>
<rasd:InstanceID>2</rasd:InstanceID>
<rasd:ResourceType>4</rasd:ResourceType>
<rasd:VirtualQuantity>1600</rasd:VirtualQuantity>
</Item>
<Item>
<rasd:Address>0</rasd:Address>
<rasd:Description>IDE Controller</rasd:Description>
<rasd:ElementName>ideController0</rasd:ElementName>
<rasd:InstanceID>3</rasd:InstanceID>
<rasd:ResourceType>5</rasd:ResourceType>
</Item>
<Item>
<rasd:Address>1</rasd:Address>
<rasd:Description>IDE Controller</rasd:Description>
<rasd:ElementName>ideController1</rasd:ElementName>
<rasd:InstanceID>4</rasd:InstanceID>
<rasd:ResourceType>5</rasd:ResourceType>
</Item>
<Item>
<rasd:AddressOnParent>0</rasd:AddressOnParent>
<rasd:AutomaticAllocation>false</rasd:AutomaticAllocation>
<rasd:Caption>floppy0</rasd:Caption>
<rasd:Description>Floppy Drive</rasd:Description>
<rasd:ElementName>floppy0</rasd:ElementName>
<rasd:InstanceID>5</rasd:InstanceID>
<rasd:ResourceType>14</rasd:ResourceType>
</Item>
<Item>
<rasd:AddressOnParent>0</rasd:AddressOnParent>
<rasd:ElementName>disk1</rasd:ElementName>
<rasd:HostResource>/disk/vmdisk1</rasd:HostResource>
<rasd:InstanceID>6</rasd:InstanceID>
<rasd:Parent>3</rasd:Parent>
<rasd:ResourceType>17</rasd:ResourceType>
</Item>
<Item>
<rasd:AddressOnParent>1</rasd:AddressOnParent>
<rasd:ElementName>disk2</rasd:ElementName>
<rasd:HostResource>/disk/vmdisk2</rasd:HostResource>
<rasd:InstanceID>7</rasd:InstanceID>
<rasd:Parent>3</rasd:Parent>
<rasd:ResourceType>17</rasd:ResourceType>
</Item>
<Item>
<rasd:AddressOnParent>0</rasd:AddressOnParent>
<rasd:ElementName>disk3</rasd:ElementName>
<rasd:HostResource>/disk/vmdisk3</rasd:HostResource>
<rasd:InstanceID>8</rasd:InstanceID>
<rasd:Parent>4</rasd:Parent>
<rasd:ResourceType>17</rasd:ResourceType>
</Item>
<Item>
<rasd:AddressOnParent>1</rasd:AddressOnParent>
<rasd:ElementName>disk4</rasd:ElementName>
<rasd:HostResource>/disk/vmdisk4</rasd:HostResource>
<rasd:InstanceID>9</rasd:InstanceID>
<rasd:Parent>4</rasd:Parent>
<rasd:ResourceType>17</rasd:ResourceType>
</Item>
<Item>
<rasd:AddressOnParent>1</rasd:AddressOnParent>
<rasd:AutomaticAllocation>true</rasd:AutomaticAllocation>
<rasd:Connection>hostonly</rasd:Connection>
<rasd:Description>E1000 ethernet adapter on "hostonly"</rasd:Description>
<rasd:ElementName>ethernet0</rasd:ElementName>
<rasd:InstanceID>10</rasd:InstanceID>
<rasd:ResourceSubType>E1000</rasd:ResourceSubType>
<rasd:ResourceType>10</rasd:ResourceType>
</Item>
<Item>
<rasd:AddressOnParent>2</rasd:AddressOnParent>
<rasd:AutomaticAllocation>true</rasd:AutomaticAllocation>
<rasd:Connection>hostonly</rasd:Connection>
<rasd:Description>E1000 ethernet adapter on "hostonly"</rasd:Description>
<rasd:ElementName>ethernet1</rasd:ElementName>
<rasd:InstanceID>11</rasd:InstanceID>
<rasd:ResourceSubType>E1000</rasd:ResourceSubType>
<rasd:ResourceType>10</rasd:ResourceType>
</Item>
<Item>
<rasd:AddressOnParent>3</rasd:AddressOnParent>
<rasd:AutomaticAllocation>true</rasd:AutomaticAllocation>
<rasd:Connection>nat</rasd:Connection>
<rasd:Description>E1000 ethernet adapter on "nat"</rasd:Description>
<rasd:ElementName>ethernet2</rasd:ElementName>
<rasd:InstanceID>12</rasd:InstanceID>
<rasd:ResourceSubType>E1000</rasd:ResourceSubType>
<rasd:ResourceType>10</rasd:ResourceType>
</Item>
<Item>
<rasd:AddressOnParent>4</rasd:AddressOnParent>
<rasd:AutomaticAllocation>true</rasd:AutomaticAllocation>
<rasd:Connection>nat</rasd:Connection>
<rasd:Description>E1000 ethernet adapter on "nat"</rasd:Description>
<rasd:ElementName>ethernet3</rasd:ElementName>
<rasd:InstanceID>13</rasd:InstanceID>
<rasd:ResourceSubType>E1000</rasd:ResourceSubType>
<rasd:ResourceType>10</rasd:ResourceType>
</Item>
</VirtualHardwareSection>
</VirtualSystem>
</Envelope>
- Mark as New
- Bookmark
- Subscribe
- Mute
- Subscribe to RSS Feed
- Permalink
- Report Inappropriate Content
Missed your post.
So, following your instructoins, I got the OVF file imported, and hit the error you mentioned:

- Mark as New
- Bookmark
- Subscribe
- Mute
- Subscribe to RSS Feed
- Permalink
- Report Inappropriate Content
VIrtualbox seems to have difficulty constructing a VM from an OVF if the elements are not presented in a certain order. All I did was re-order the item elements, for example so ide controller 0 comes before ide controller 1, and the disks connect in order, etc. The ovf I posted above also has vmdk names, etc, that match what is included in the vsim tgz archives. The vsim OVA archives have different filenames/elements needed to connect the disks but re-ordering was the key to get it to import. The InstanceID fields need to be reordered as well as the order the items appear in the xml.
For more than you ever wanted to know about ovf and ova, you can read the standard:
https://www.dmtf.org/standards/ovf
The various implementations seem to each have their own idiosyncrasies. Virtualbox is sensitive to ordering, microsoft can't cope with vmdk files... its all part of the fun.
- Mark as New
- Bookmark
- Subscribe
- Mute
- Subscribe to RSS Feed
- Permalink
- Report Inappropriate Content
Wait, is the ordering in the VMDK files or in the virtual storage itself? I'm totally new to NetApp, so I'm not sure what's what.
- Mark as New
- Bookmark
- Subscribe
- Mute
- Subscribe to RSS Feed
- Permalink
- Report Inappropriate Content
This isn't really NetApp specific, its how virtualbox parses the ovf format in their implementation of the standard.
Inside an OVA file (which is a tar with specific constraints), you'll find the ovf, the vmdk file, a manifest file (for checksum validation), and sometimes other elements. The ovf is an xml-like standards based way tof defining the virtual machine. The intent of the standard is to allow VMs to be interchanged between virtualization platforms, In practice there are a lot of rough edges.
Inside the TGZ archives you'll find when you download the older simulator releases, you'll find the vmdk files, and a vmx file (among others). These are virtual machines in a format native to VMware. Adding an ovf to this file set just facilitates importing them into virtualbox, as a less error prone alternative to hand crafting a new vm in virtualbox and attaching the virtual disks.
- Mark as New
- Bookmark
- Subscribe
- Mute
- Subscribe to RSS Feed
- Permalink
- Report Inappropriate Content
From your screenshot it looks like you imported successfully. Now you just need to ctrl-c at the boot menu during the next reboot and pick option 4 to install Data ONTAP.
- Mark as New
- Bookmark
- Subscribe
- Mute
- Subscribe to RSS Feed
- Permalink
- Report Inappropriate Content
Is there an update version of this document for Simulator ONTAP 8.3 with Virtualbox?
I was able to use same methodoly here for Simulator ONTAP 8.2 but not for Simulator ONTAP 8.3. There seem to be quite a bit of change in version 8.3. There is no longer sim. vmdk, var.vmdk, nvram.vmdk and base vmdk.
I was able to extract Sim 8.3.2 OVA file into 4 VMDK files which are supposedly similar to previous ones but with different names '*disk[1-4].vmdk'. I kept getting PANIC errors:
VLOADER> setenv SYS_SERIAL_NUM 4082368507
VLOADER> setenv bootarg.nvram.sysid 4082368507
VLOADER> setenv bootarg.vm.run_vmtools false
VLOADER> boot_ontap
x86_64/freebsd/image1/kernel data=0x9a17d0+0x479ab8 syms=[0x8+0x46800+0x8+0x2fc53]
x86_64/freebsd/image1/platform.ko text=0x1e5add data=0x485a0+0x42bd0 syms=[0x8+0x21780+0x8+0x175e8]
NetApp Data ONTAP 8.3.2RC1
ioapic0: Changing APIC ID to 0
Copyright (C) 1992-2015 NetApp.
All rights reserved.
*******************************
* *
* Press Ctrl-C for Boot Menu. *
* *
*******************************
^CBoot Menu will be available.
Please choose one of the following:
(1) Normal Boot.
(2) Boot without /etc/rc.
(3) Change password.
(4) Clean configuration and initialize all disks.
(5) Maintenance mode boot.
(6) Update flash from backup config.
(7) Install new software first.
(8) Reboot node.
Selection (1-8)? 4
WAFL CPLEDGER is enabled. Checklist = 0x7ff841ff
PANIC : prod/common/wafl/free_cache.c:909: Assertion failure.
version: 8.3.2RC1: Thu Nov 5 01:54:42 PST 2015
conf : x86_64.sim
cpuid = 0
Uptime: 1m8s
PANIC: prod/common/wafl/free_cache.c:909: Assertion failure. in SK process wafl_hipri on release 8.3.2RC1 (C) on Thu Feb 25 15:35:13 GMT 2016
version: 8.3.2RC1: Thu Nov 5 01:54:42 PST 2015
compile flags: x86_64.sim
recursive PANIC: page_t has no physical address
cpuid = 0
Uptime: 1m8s
The operating system has halted.
Please press any key to reboot.
Any insight to this problem would be greatly appreciated.
Thanks,
Hien
- Mark as New
- Bookmark
- Subscribe
- Mute
- Subscribe to RSS Feed
- Permalink
- Report Inappropriate Content
Hien -
The same basic steps work - but as you point out the vmdks are different for 8.3 You can generally figure out the order and which files go with which controllers by examining the vmx file describing the machine.
Also, in this same thread, read all the posts from Sean Hatfield. Then check out his other posts for Simulator topics. Good stuff. A lot of them describe details about later versions of the simulator and the oddities that each virtualization product associates with the OVA/OVF descriptor formats. Generally the manual steps still work but Sean has ways to update the OVF for automatic import.
The only issue I've found is that VBox really didn't like the vmdk's in the simulator package, at least on a Mac. I used the VBox utility to convert to VDI's and it worked much better for me.
Hope this helps.
Bob Greenwald
Lead Storage Engineer | Consilio LLC
NCIE SAN Clustered, Data Protection
Judos and accepted solutions are alwys appreciated.
- Mark as New
- Bookmark
- Subscribe
- Mute
- Subscribe to RSS Feed
- Permalink
- Report Inappropriate Content
Thanks Bob.
That panic looks like a RAM shortage. Try it with 3072, 3580, or 6144. VBox doesn't appear to provide control of PCI hole placement, and at 4-5gb it seems to be landing in an unfortunate spot in the address space. Use 6gb+ or 3-3.5gb to work around the hole. The old 1600mb sizing is too small for 8.3+.
The 8.3+ simulators are distributed as OVAs now so the vmdks are in a gz compressed sparse optimized format. They can import on mac with the OVA adjustments. I'll dig up a sample and post it later.
- Mark as New
- Bookmark
- Subscribe
- Mute
- Subscribe to RSS Feed
- Permalink
- Report Inappropriate Content
Thank you Bob and Sean! Setting memory to 3072MB and 6144MB work for Simulator 8.3.2 on VirtualBox. Sure it would work with 3580MB. How do I ACCEPT AS SOLUTION?
- Mark as New
- Bookmark
- Subscribe
- Mute
- Subscribe to RSS Feed
- Permalink
- Report Inappropriate Content
Since you didn't make the thread you can't mark a solution. Best you can do is add kudos so the helpful posts stand out.
- Mark as New
- Bookmark
- Subscribe
- Mute
- Subscribe to RSS Feed
- Permalink
- Report Inappropriate Content
Here's my ovf file for the 832rc1 workstation build with the virtualbox adjustments. Untar the OVA, delete the .mf manifest, and replace the contents of the .ovf with this and it should import. Then connect the NICs to your hostonly and nat networks accordingly and power it up.
<?xml version="1.0" encoding="UTF-8"?>
<!--Generated by VMware ovftool 1.0.0 (build-166674), User: nviet, UTC time: 2015-11-16T15:43:26.043808Z-->
<Envelope vmw:buildId="build-166674" xmlns="http://schemas.dmtf.org/ovf/envelope/1" xmlns:cim="http://schemas.dmtf.org/wbem/wscim/1/common" xmlns:ovf="http://schemas.dmtf.org/ovf/envelope/1" xmlns:rasd="http://schemas.dmtf.org/wbem/wscim/1/cim-schema/2/CIM_ResourceAllocationSettingData" xmlns:vmw="http://www.vmware.com/schema/ovf" xmlns:vssd="http://schemas.dmtf.org/wbem/wscim/1/cim-schema/2/CIM_VirtualSystemSettingData" xmlns:xsi="http://www.w3.org/2001/XMLSchema-instance">
<References>
<File ovf:compression="gzip" ovf:href="vsim-netapp-DOT8.3.2RC1-cm-disk1.vmdk.gz" ovf:id="file1" ovf:size="557577272"/>
<File ovf:compression="gzip" ovf:href="vsim-netapp-DOT8.3.2RC1-cm-disk2.vmdk.gz" ovf:id="file2" ovf:size="605"/>
<File ovf:compression="gzip" ovf:href="vsim-netapp-DOT8.3.2RC1-cm-disk3.vmdk.gz" ovf:id="file3" ovf:size="612"/>
<File ovf:compression="gzip" ovf:href="vsim-netapp-DOT8.3.2RC1-cm-disk4.vmdk.gz" ovf:id="file4" ovf:size="627"/>
</References>
<DiskSection>
<Info>Virtual disk information</Info>
<Disk ovf:allocationUnits="1048576" ovf:capacity="1943" ovf:capacityAllocationUnits="byte * 2^20" ovf:diskId="vmdisk1" ovf:fileRef="file1" ovf:format="http://www.vmware.com/interfaces/specifications/vmdk.html#streamOptimized" ovf:populatedSize="567607296"/>
<Disk ovf:allocationUnits="1048576" ovf:capacity="1542" ovf:capacityAllocationUnits="byte * 2^20" ovf:diskId="vmdisk2" ovf:fileRef="file2" ovf:format="http://www.vmware.com/interfaces/specifications/vmdk.html#streamOptimized" ovf:populatedSize="65536"/>
<Disk ovf:allocationUnits="1048576" ovf:capacity="4865" ovf:capacityAllocationUnits="byte * 2^20" ovf:diskId="vmdisk3" ovf:fileRef="file3" ovf:format="http://www.vmware.com/interfaces/specifications/vmdk.html#streamOptimized" ovf:populatedSize="65536"/>
<Disk ovf:allocationUnits="1048576" ovf:capacity="236231" ovf:capacityAllocationUnits="byte * 2^20" ovf:diskId="vmdisk4" ovf:fileRef="file4" ovf:format="http://www.vmware.com/interfaces/specifications/vmdk.html#streamOptimized" ovf:populatedSize="65536"/>
</DiskSection>
<NetworkSection>
<Info>The list of logical networks</Info>
<Network ovf:name="hostonly">
<Description>The hostonly network</Description>
</Network>
<Network ovf:name="nat">
<Description>The nat network</Description>
</Network>
</NetworkSection>
<VirtualSystem ovf:id="vsim_netapp-DOT8.3.2RC1-cm">
<Info>A virtual machine</Info>
<Name>vsim_netapp-DOT8.3.2RC1-cm</Name>
<OperatingSystemSection ovf:id="78" vmw:osType="freebsd64Guest">
<Info>The kind of installed guest operating system</Info>
</OperatingSystemSection>
<VirtualHardwareSection>
<Info>Virtual hardware requirements</Info>
<System>
<vssd:ElementName>Virtual Hardware Family</vssd:ElementName>
<vssd:InstanceID>0</vssd:InstanceID>
<vssd:VirtualSystemIdentifier>vsim_netapp-DOT8.3.2RC1-cm</vssd:VirtualSystemIdentifier>
<vssd:VirtualSystemType>vmx-07</vssd:VirtualSystemType>
</System>
<Item>
<rasd:AllocationUnits>hertz * 10^6</rasd:AllocationUnits>
<rasd:Description>Number of Virtual CPUs</rasd:Description>
<rasd:ElementName>2 virtual CPU(s)</rasd:ElementName>
<rasd:InstanceID>1</rasd:InstanceID>
<rasd:ResourceType>3</rasd:ResourceType>
<rasd:VirtualQuantity>2</rasd:VirtualQuantity>
</Item>
<Item>
<rasd:AllocationUnits>byte * 2^20</rasd:AllocationUnits>
<rasd:Description>Memory Size</rasd:Description>
<rasd:ElementName>3580MB of memory</rasd:ElementName>
<rasd:InstanceID>2</rasd:InstanceID>
<rasd:ResourceType>4</rasd:ResourceType>
<rasd:VirtualQuantity>3580</rasd:VirtualQuantity>
</Item>
<Item>
<rasd:Address>0</rasd:Address>
<rasd:Description>IDE Controller</rasd:Description>
<rasd:ElementName>ideController0</rasd:ElementName>
<rasd:InstanceID>3</rasd:InstanceID>
<rasd:ResourceType>5</rasd:ResourceType>
</Item>
<Item>
<rasd:Address>1</rasd:Address>
<rasd:Description>IDE Controller</rasd:Description>
<rasd:ElementName>ideController1</rasd:ElementName>
<rasd:InstanceID>4</rasd:InstanceID>
<rasd:ResourceType>5</rasd:ResourceType>
</Item>
<Item>
<rasd:AddressOnParent>0</rasd:AddressOnParent>
<rasd:AutomaticAllocation>false</rasd:AutomaticAllocation>
<rasd:Caption>floppy0</rasd:Caption>
<rasd:Description>Floppy Drive</rasd:Description>
<rasd:ElementName>floppy0</rasd:ElementName>
<rasd:InstanceID>5</rasd:InstanceID>
<rasd:ResourceType>14</rasd:ResourceType>
</Item>
<Item>
<rasd:AddressOnParent>0</rasd:AddressOnParent>
<rasd:ElementName>disk1</rasd:ElementName>
<rasd:HostResource>ovf:/disk/vmdisk1</rasd:HostResource>
<rasd:InstanceID>6</rasd:InstanceID>
<rasd:Parent>3</rasd:Parent>
<rasd:ResourceType>17</rasd:ResourceType>
</Item>
<Item>
<rasd:AddressOnParent>1</rasd:AddressOnParent>
<rasd:ElementName>disk2</rasd:ElementName>
<rasd:HostResource>ovf:/disk/vmdisk2</rasd:HostResource>
<rasd:InstanceID>7</rasd:InstanceID>
<rasd:Parent>3</rasd:Parent>
<rasd:ResourceType>17</rasd:ResourceType>
</Item>
<Item>
<rasd:AddressOnParent>0</rasd:AddressOnParent>
<rasd:ElementName>disk3</rasd:ElementName>
<rasd:HostResource>ovf:/disk/vmdisk3</rasd:HostResource>
<rasd:InstanceID>8</rasd:InstanceID>
<rasd:Parent>4</rasd:Parent>
<rasd:ResourceType>17</rasd:ResourceType>
</Item>
<Item>
<rasd:AddressOnParent>1</rasd:AddressOnParent>
<rasd:ElementName>disk4</rasd:ElementName>
<rasd:HostResource>ovf:/disk/vmdisk4</rasd:HostResource>
<rasd:InstanceID>9</rasd:InstanceID>
<rasd:Parent>4</rasd:Parent>
<rasd:ResourceType>17</rasd:ResourceType>
</Item>
<Item>
<rasd:AddressOnParent>1</rasd:AddressOnParent>
<rasd:AutomaticAllocation>true</rasd:AutomaticAllocation>
<rasd:Connection>hostonly</rasd:Connection>
<rasd:Description>E1000 ethernet adapter on "hostonly"</rasd:Description>
<rasd:ElementName>ethernet0</rasd:ElementName>
<rasd:InstanceID>10</rasd:InstanceID>
<rasd:ResourceSubType>E1000</rasd:ResourceSubType>
<rasd:ResourceType>10</rasd:ResourceType>
</Item>
<Item>
<rasd:AddressOnParent>2</rasd:AddressOnParent>
<rasd:AutomaticAllocation>true</rasd:AutomaticAllocation>
<rasd:Connection>hostonly</rasd:Connection>
<rasd:Description>E1000 ethernet adapter on "hostonly"</rasd:Description>
<rasd:ElementName>ethernet1</rasd:ElementName>
<rasd:InstanceID>11</rasd:InstanceID>
<rasd:ResourceSubType>E1000</rasd:ResourceSubType>
<rasd:ResourceType>10</rasd:ResourceType>
</Item>
<Item>
<rasd:AddressOnParent>3</rasd:AddressOnParent>
<rasd:AutomaticAllocation>true</rasd:AutomaticAllocation>
<rasd:Connection>nat</rasd:Connection>
<rasd:Description>E1000 ethernet adapter on "nat"</rasd:Description>
<rasd:ElementName>ethernet2</rasd:ElementName>
<rasd:InstanceID>12</rasd:InstanceID>
<rasd:ResourceSubType>E1000</rasd:ResourceSubType>
<rasd:ResourceType>10</rasd:ResourceType>
</Item>
<Item>
<rasd:AddressOnParent>4</rasd:AddressOnParent>
<rasd:AutomaticAllocation>true</rasd:AutomaticAllocation>
<rasd:Connection>nat</rasd:Connection>
<rasd:Description>E1000 ethernet adapter on "nat"</rasd:Description>
<rasd:ElementName>ethernet3</rasd:ElementName>
<rasd:InstanceID>13</rasd:InstanceID>
<rasd:ResourceSubType>E1000</rasd:ResourceSubType>
<rasd:ResourceType>10</rasd:ResourceType>
</Item>
</VirtualHardwareSection>
</VirtualSystem>
</Envelope>
- Mark as New
- Bookmark
- Subscribe
- Mute
- Subscribe to RSS Feed
- Permalink
- Report Inappropriate Content
Has anyone has success in setting up 2nd node using Simulator 8.2.2 or 8.3.2 on VirtualBox?
I had success in setting the 1st node repeatedly but failed on joining 2nd node to the cluster all the times so far. Kept getting the following errors:
Enter the name of the cluster you would like to join [c1]: c1
Joining cluster c1
Network set up ................Error: Remote ping test failed. Verify that this node is cabled correctly and
that the cluster interfaces are using ports on the internal cluster network.
To verify, run the ping command from the CLI. For example,
"network ping -lif clus1 -lif-owner node-01 -destination <cluster ip from cluster> -verbose true -show-detail true".
Restarting Cluster Setup
When trying network ping command as suggested above, it failed miserably:
c1::> network ping -lif clus1 -lif-owner c1-01 -destination 10.10.1.80 -verbose true -show-detail true -count 3
PING 10.10.1.80 (10.10.1.80) from 169.254.17.11: 56 data bytes
--- 10.10.1.80 ping statistics ---
3 packets transmitted, 0 packets received, 100.0% packet loss
Is there any requirement for Cluster hearbeat interfaces [e0a,e0b] to be on the same network as the other NICs? In my case I have the followings. Should all NICs be on same network?
NIC # 1 --> e0a --> Host-only Adapter --> DHCP (Cluster Heartbeat)
NIC # 2 --> e0b --> Host-only Adapter --> DHCP (Cluster Heartbeat)
NIC # 3 --> e0c --> Host-only Adapter # 2 --> Assigned IP (Cluster Management)
NIC # 4 --> e0d --> Host-only Adapter # 2 --> Open
NIC # 5 --> e0e --> Host-only Adapter # 2 --> Open
NIC # 6 --> e0f --> Host-only Adapter # 2 --> Assigned IP (Node Management)
Double and triple check network settings which appear to be fine:
Feb 23 17:12:36 [localhost:snmp.link.up:info]: Interface 6 is up
Feb 23 17:12:36 [localhost:netif.linkUp:info]: Ethernet e0f: Link up.
Feb 23 17:12:36 [localhost:snmp.link.up:info]: Interface 5 is up
Feb 23 17:12:36 [localhost:netif.linkUp:info]: Ethernet e0e: Link up.
Feb 23 17:12:36 [localhost:snmp.link.up:info]: Interface 4 is up
Feb 23 17:12:36 [localhost:netif.linkUp:info]: Ethernet e0d: Link up.
Feb 23 17:12:36 [localhost:snmp.link.up:info]: Interface 3 is up
Feb 23 17:12:36 [localhost:netif.linkUp:info]: Ethernet e0c: Link up.
Feb 23 17:12:36 [localhost:snmp.link.up:info]: Interface 2 is up
Feb 23 17:12:36 [localhost:netif.linkUp:info]: Ethernet e0b: Link up.
Feb 23 17:12:36 [localhost:snmp.link.up:info]: Interface 1 is up
Feb 23 17:12:36 [localhost:netif.linkUp:info]: Ethernet e0a: Link up.

c1::> net int show
(network interface show)
Logical Status Network Current Current Is
Vserver Interface Admin/Oper Address/Mask Node Port Home
----------- ---------- ---------- ------------------ ------------- ------- ----
c1
cluster_mgmt up/up 10.10.1.80/24 c1-01 e0c true
c1-01
clus1 up/up 169.254.17.11/16 c1-01 e0a true
clus2 up/up 169.254.210.87/16 c1-01 e0b true
mgmt1 up/up 10.10.1.81/24 c1-01 e0f true
vs1
c1-01_iscsi_lif_1
up/up 10.10.1.85/24 c1-01 e0c true
c1-01_iscsi_lif_2
up/up 10.10.1.86/24 c1-01 e0d true
vs1_admin_lif1
up/up 10.10.1.84/24 c1-01 e0e true
7 entries were displayed.
c1::> net port show
(network port show)
Auto-Negot Duplex Speed (Mbps)
Node Port Role Link MTU Admin/Oper Admin/Oper Admin/Oper
------ ------ ------------ ---- ----- ----------- ---------- ------------
c1-01
e0a cluster up 1500 true/true full/full auto/1000
e0b cluster up 1500 true/true full/full auto/1000
e0c data up 1500 true/true full/full auto/1000
e0d data up 1500 true/true full/full auto/1000
e0e data up 1500 true/true full/full auto/1000
e0f node-mgmt up 1500 true/true full/full auto/1000
6 entries were displayed.
Any insight would be very much appreciated.
Thanks,
Hien
