Stay connected during the transition - Join our Discord community today.
Simulator Discussions
- Home
- :
- Developer Network
- :
- Simulator Discussions
- :
- Simulate ONTAP 8.1.1 withVirtualBox
Simulator Discussions
- Subscribe to RSS Feed
- Mark Topic as New
- Mark Topic as Read
- Float this Topic for Current User
- Bookmark
- Subscribe
- Mute
- Printer Friendly Page
- Mark as New
- Bookmark
- Subscribe
- Mute
- Subscribe to RSS Feed
- Permalink
- Report Inappropriate Content
There have been a small number of posts both here and in the support community about the change between the 7.3 family of OnTap simulators and those for 8.1.1. The delivery model changed from being one where you install the simulator on a Linux system (easily setup on any virtualization platform you have) to the model in 8.1.1 Simulator where you download a full virtual machine image designed for use in a VMWare environment only.
Many people will have access to one of the paid options (VMWare Workstation/Fusions/ESX) or can use the free VMWare Player on Windows. But, for those that need alternatives such as on a Linux or Solaris host platform or something free on a Mac, here are instructions to setup 8.1.1 Simulator on VirtualBox.
Disclaimer: to date I have only tested this on a single Windows platform. Specifically, I tested this on a 32 bit Windows 7 host (but on 64 bit capable hardware). Basic setup and general operations seem normally functional, though I have not delved into all the possibilities that OnTap offers. The 7-mode simulator is the one on which I did most checkouts since this is what I need to make available to other team members where I work. I have done minimal setup only on cluster mode. None of this is technically supported by NetApp, and your mileage may vary.
Test environment: Dell laptop, 3GB RAM running Windows 7 SP1 32 bit; VirtualBox 4.2.4r81684; Simulate OnTap 8.1.1. As per the VirtualBox documentation, you will need a 64 bit processor with virtualization enhancements enabled even if the host OS is 32 bit.
Setup (assumes basic familiarity with VirtualBox)
1. Download and install VirtualBox. I just used defaults for setup.
2. Download the 8.1.1 simulator. Extract the files somewhere that you want them to be.
3. Create a new Virtual Machine with OS type BSD, version FreeBSD (64 bit). Memory required is 1600MB. Don't select a virtual hard drive now, we need to select a bunch later. Save the new machine.
4. Open the Settings for the new VM. On the System page, Processor tab, set CPU to 2
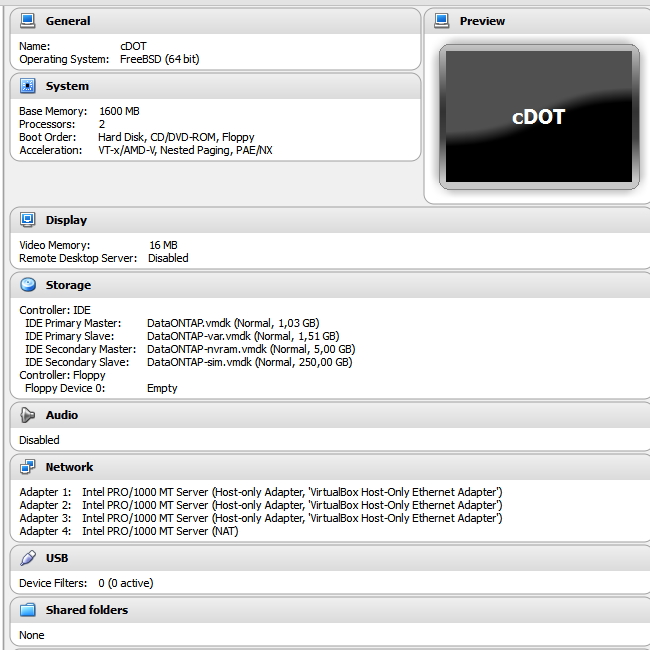
5. On the Storage path, delete the CDROM from the IDE controller. Then, add 4 virtual hard disks to the controller. For each disk, you will choose an existing disk. The disks you will add, in order, are "DataONTAP.vmdk", "DataONTAP-var.vmdk", "DataONTAP-nvram.vmdk", and "DataONTAP-sim.vmdk". Finally, add a Floppy controller with a single, empty floppy drive. When complete, the storage setup for your new virtual machine should look like:

6. On the audio page, uncheck "Enable Audio".
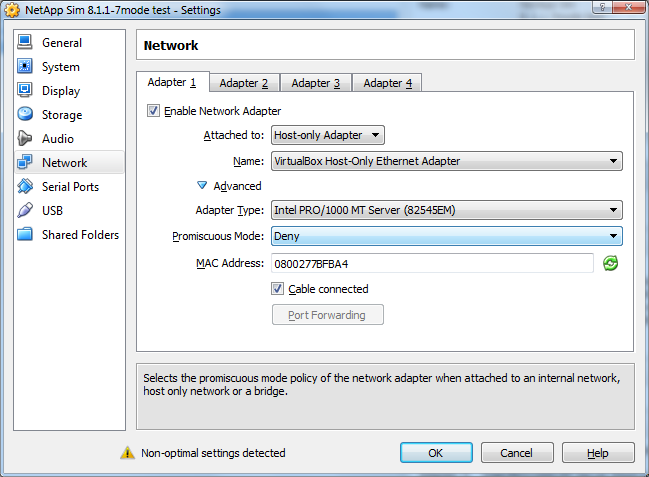
7. On the network page, you can add up to 4 network adapters in any style that you choose - host only, bridged, internal, NAT. This provides a bit more choice than available through VMWare Player. Having some NICs of each type certainly can setup some interesting possibilities for multiple simulators. For each NIC you add, expand the "Advanced" section for the NIC and select "Intel PRO/1000 MT Server (82545EM)" as the adapter type. The Simulator virtual machine only has drivers for this emulated NIC type. A sample NIC setup would look like:
8. The default setup of the VMWare virtual machine attaches a local Windows pipe as a conduit to each of two serial ports - one for the "console" and one for debugging. You can enable serial ports and redirect, but it is not required.
9. On the USB page, uncheck "Enable USB Controller".
10. On the Shared Folders page, no shared folders need be created.
11. Save the virtual machine.
12. Be sure you have 1600MB real free memory to start the guest or it will fail during startup at some point.
13. Start the virtual machine.
14. During the 10 second countdown, click in the VM and press any key that is NOT Enter to stop the boot.
15. Update the environment to not start the VMWare tools with command "setenv bootarg.vm.run_vmtools false"
16. If you are installing a 2nd simulator this is a great time to update the serial number as per the documentation as well.
17. Enter command "boot" to continue with the startup of Data OnTAP.
18. When the "Press Cntrl-C for menu" appears, press Cntrl-C and wait for the boot menu. This first boot can take a little bit to happen depending on your hosting platform.
19. On the boot menu, select option 4 and confirm clearing all disks and deleting all data.
20. The Simulator will restart - let it proceed normally. After restoring a fresh Data OnTAP from the simulated media you will eventually get the prompts for standard setup of a new Filer.
Enjoy!
Solved! See The Solution
- Mark as New
- Bookmark
- Subscribe
- Mute
- Subscribe to RSS Feed
- Permalink
- Report Inappropriate Content
Here's my ovf file for the 832rc1 workstation build with the virtualbox adjustments. Untar the OVA, delete the .mf manifest, and replace the contents of the .ovf with this and it should import. Then connect the NICs to your hostonly and nat networks accordingly and power it up.
<?xml version="1.0" encoding="UTF-8"?>
<!--Generated by VMware ovftool 1.0.0 (build-166674), User: nviet, UTC time: 2015-11-16T15:43:26.043808Z-->
<Envelope vmw:buildId="build-166674" xmlns="http://schemas.dmtf.org/ovf/envelope/1" xmlns:cim="http://schemas.dmtf.org/wbem/wscim/1/common" xmlns:ovf="http://schemas.dmtf.org/ovf/envelope/1" xmlns:rasd="http://schemas.dmtf.org/wbem/wscim/1/cim-schema/2/CIM_ResourceAllocationSettingData" xmlns:vmw="http://www.vmware.com/schema/ovf" xmlns:vssd="http://schemas.dmtf.org/wbem/wscim/1/cim-schema/2/CIM_VirtualSystemSettingData" xmlns:xsi="http://www.w3.org/2001/XMLSchema-instance">
<References>
<File ovf:compression="gzip" ovf:href="vsim-netapp-DOT8.3.2RC1-cm-disk1.vmdk.gz" ovf:id="file1" ovf:size="557577272"/>
<File ovf:compression="gzip" ovf:href="vsim-netapp-DOT8.3.2RC1-cm-disk2.vmdk.gz" ovf:id="file2" ovf:size="605"/>
<File ovf:compression="gzip" ovf:href="vsim-netapp-DOT8.3.2RC1-cm-disk3.vmdk.gz" ovf:id="file3" ovf:size="612"/>
<File ovf:compression="gzip" ovf:href="vsim-netapp-DOT8.3.2RC1-cm-disk4.vmdk.gz" ovf:id="file4" ovf:size="627"/>
</References>
<DiskSection>
<Info>Virtual disk information</Info>
<Disk ovf:allocationUnits="1048576" ovf:capacity="1943" ovf:capacityAllocationUnits="byte * 2^20" ovf:diskId="vmdisk1" ovf:fileRef="file1" ovf:format="http://www.vmware.com/interfaces/specifications/vmdk.html#streamOptimized" ovf:populatedSize="567607296"/>
<Disk ovf:allocationUnits="1048576" ovf:capacity="1542" ovf:capacityAllocationUnits="byte * 2^20" ovf:diskId="vmdisk2" ovf:fileRef="file2" ovf:format="http://www.vmware.com/interfaces/specifications/vmdk.html#streamOptimized" ovf:populatedSize="65536"/>
<Disk ovf:allocationUnits="1048576" ovf:capacity="4865" ovf:capacityAllocationUnits="byte * 2^20" ovf:diskId="vmdisk3" ovf:fileRef="file3" ovf:format="http://www.vmware.com/interfaces/specifications/vmdk.html#streamOptimized" ovf:populatedSize="65536"/>
<Disk ovf:allocationUnits="1048576" ovf:capacity="236231" ovf:capacityAllocationUnits="byte * 2^20" ovf:diskId="vmdisk4" ovf:fileRef="file4" ovf:format="http://www.vmware.com/interfaces/specifications/vmdk.html#streamOptimized" ovf:populatedSize="65536"/>
</DiskSection>
<NetworkSection>
<Info>The list of logical networks</Info>
<Network ovf:name="hostonly">
<Description>The hostonly network</Description>
</Network>
<Network ovf:name="nat">
<Description>The nat network</Description>
</Network>
</NetworkSection>
<VirtualSystem ovf:id="vsim_netapp-DOT8.3.2RC1-cm">
<Info>A virtual machine</Info>
<Name>vsim_netapp-DOT8.3.2RC1-cm</Name>
<OperatingSystemSection ovf:id="78" vmw:osType="freebsd64Guest">
<Info>The kind of installed guest operating system</Info>
</OperatingSystemSection>
<VirtualHardwareSection>
<Info>Virtual hardware requirements</Info>
<System>
<vssd:ElementName>Virtual Hardware Family</vssd:ElementName>
<vssd:InstanceID>0</vssd:InstanceID>
<vssd:VirtualSystemIdentifier>vsim_netapp-DOT8.3.2RC1-cm</vssd:VirtualSystemIdentifier>
<vssd:VirtualSystemType>vmx-07</vssd:VirtualSystemType>
</System>
<Item>
<rasd:AllocationUnits>hertz * 10^6</rasd:AllocationUnits>
<rasd:Description>Number of Virtual CPUs</rasd:Description>
<rasd:ElementName>2 virtual CPU(s)</rasd:ElementName>
<rasd:InstanceID>1</rasd:InstanceID>
<rasd:ResourceType>3</rasd:ResourceType>
<rasd:VirtualQuantity>2</rasd:VirtualQuantity>
</Item>
<Item>
<rasd:AllocationUnits>byte * 2^20</rasd:AllocationUnits>
<rasd:Description>Memory Size</rasd:Description>
<rasd:ElementName>3580MB of memory</rasd:ElementName>
<rasd:InstanceID>2</rasd:InstanceID>
<rasd:ResourceType>4</rasd:ResourceType>
<rasd:VirtualQuantity>3580</rasd:VirtualQuantity>
</Item>
<Item>
<rasd:Address>0</rasd:Address>
<rasd:Description>IDE Controller</rasd:Description>
<rasd:ElementName>ideController0</rasd:ElementName>
<rasd:InstanceID>3</rasd:InstanceID>
<rasd:ResourceType>5</rasd:ResourceType>
</Item>
<Item>
<rasd:Address>1</rasd:Address>
<rasd:Description>IDE Controller</rasd:Description>
<rasd:ElementName>ideController1</rasd:ElementName>
<rasd:InstanceID>4</rasd:InstanceID>
<rasd:ResourceType>5</rasd:ResourceType>
</Item>
<Item>
<rasd:AddressOnParent>0</rasd:AddressOnParent>
<rasd:AutomaticAllocation>false</rasd:AutomaticAllocation>
<rasd:Caption>floppy0</rasd:Caption>
<rasd:Description>Floppy Drive</rasd:Description>
<rasd:ElementName>floppy0</rasd:ElementName>
<rasd:InstanceID>5</rasd:InstanceID>
<rasd:ResourceType>14</rasd:ResourceType>
</Item>
<Item>
<rasd:AddressOnParent>0</rasd:AddressOnParent>
<rasd:ElementName>disk1</rasd:ElementName>
<rasd:HostResource>ovf:/disk/vmdisk1</rasd:HostResource>
<rasd:InstanceID>6</rasd:InstanceID>
<rasd:Parent>3</rasd:Parent>
<rasd:ResourceType>17</rasd:ResourceType>
</Item>
<Item>
<rasd:AddressOnParent>1</rasd:AddressOnParent>
<rasd:ElementName>disk2</rasd:ElementName>
<rasd:HostResource>ovf:/disk/vmdisk2</rasd:HostResource>
<rasd:InstanceID>7</rasd:InstanceID>
<rasd:Parent>3</rasd:Parent>
<rasd:ResourceType>17</rasd:ResourceType>
</Item>
<Item>
<rasd:AddressOnParent>0</rasd:AddressOnParent>
<rasd:ElementName>disk3</rasd:ElementName>
<rasd:HostResource>ovf:/disk/vmdisk3</rasd:HostResource>
<rasd:InstanceID>8</rasd:InstanceID>
<rasd:Parent>4</rasd:Parent>
<rasd:ResourceType>17</rasd:ResourceType>
</Item>
<Item>
<rasd:AddressOnParent>1</rasd:AddressOnParent>
<rasd:ElementName>disk4</rasd:ElementName>
<rasd:HostResource>ovf:/disk/vmdisk4</rasd:HostResource>
<rasd:InstanceID>9</rasd:InstanceID>
<rasd:Parent>4</rasd:Parent>
<rasd:ResourceType>17</rasd:ResourceType>
</Item>
<Item>
<rasd:AddressOnParent>1</rasd:AddressOnParent>
<rasd:AutomaticAllocation>true</rasd:AutomaticAllocation>
<rasd:Connection>hostonly</rasd:Connection>
<rasd:Description>E1000 ethernet adapter on "hostonly"</rasd:Description>
<rasd:ElementName>ethernet0</rasd:ElementName>
<rasd:InstanceID>10</rasd:InstanceID>
<rasd:ResourceSubType>E1000</rasd:ResourceSubType>
<rasd:ResourceType>10</rasd:ResourceType>
</Item>
<Item>
<rasd:AddressOnParent>2</rasd:AddressOnParent>
<rasd:AutomaticAllocation>true</rasd:AutomaticAllocation>
<rasd:Connection>hostonly</rasd:Connection>
<rasd:Description>E1000 ethernet adapter on "hostonly"</rasd:Description>
<rasd:ElementName>ethernet1</rasd:ElementName>
<rasd:InstanceID>11</rasd:InstanceID>
<rasd:ResourceSubType>E1000</rasd:ResourceSubType>
<rasd:ResourceType>10</rasd:ResourceType>
</Item>
<Item>
<rasd:AddressOnParent>3</rasd:AddressOnParent>
<rasd:AutomaticAllocation>true</rasd:AutomaticAllocation>
<rasd:Connection>nat</rasd:Connection>
<rasd:Description>E1000 ethernet adapter on "nat"</rasd:Description>
<rasd:ElementName>ethernet2</rasd:ElementName>
<rasd:InstanceID>12</rasd:InstanceID>
<rasd:ResourceSubType>E1000</rasd:ResourceSubType>
<rasd:ResourceType>10</rasd:ResourceType>
</Item>
<Item>
<rasd:AddressOnParent>4</rasd:AddressOnParent>
<rasd:AutomaticAllocation>true</rasd:AutomaticAllocation>
<rasd:Connection>nat</rasd:Connection>
<rasd:Description>E1000 ethernet adapter on "nat"</rasd:Description>
<rasd:ElementName>ethernet3</rasd:ElementName>
<rasd:InstanceID>13</rasd:InstanceID>
<rasd:ResourceSubType>E1000</rasd:ResourceSubType>
<rasd:ResourceType>10</rasd:ResourceType>
</Item>
</VirtualHardwareSection>
</VirtualSystem>
</Envelope>
- Mark as New
- Bookmark
- Subscribe
- Mute
- Subscribe to RSS Feed
- Permalink
- Report Inappropriate Content
Hi
I am trying to install ClusterMode 8.1.1 sim on VirtualBOx v4.2.4
I have download the Netapp sim - bit it contains only 2 files (DataONTAP-flat.vmdk , DataONTAP-nvram-flat.vmdk) , and 1 directory (cfcard/env/env file).
I define BSD 64bit VM, but when i try to import the vmdk files i get the following error:
Failed to open the hard disk C:\vsim-cm1\DataONTAP-flat.vmdk.
Could not get the storage format of the medium 'C:\vsim-cm1\DataONTAP-flat.vmdk' (VERR_NOT_SUPPORTED).
| Result Code: | VBOX_E_IPRT_ERROR (0x80BB0005) |
| Component: | Medium |
| Interface: | IMedium {29989373-b111-4654-8493-2e1176cba890} |
| Callee: | IVirtualBox {3b2f08eb-b810-4715-bee0-bb06b9880ad2} |
| Callee RC: | VBOX_E_OBJECT_NOT_FOUND (0x80BB0001) |
Please advise...
- Mark as New
- Bookmark
- Subscribe
- Mute
- Subscribe to RSS Feed
- Permalink
- Report Inappropriate Content
Hi:
I have the same problem. Further, the "setenv" command seems to do nothing. When I hit a random key during the initial startup, I am sent to a prompt:
FreeBSD/i386 boot
Default: 0:ad(0,a)/boot/loader
boot:
When I enter "setenv bootarg.vm.run_vmtools false" at this prompt the response is:
FreeBSD/i386 boot
Default: 0:ad(0,a)false
boot:
If I type "boot" at this prompt the response is:
No boot
FreeBSD/i386 boot
Default: 0:ad(0,a)boot
boot:
Any ideas appreciated.
Thanks!
- Mark as New
- Bookmark
- Subscribe
- Mute
- Subscribe to RSS Feed
- Permalink
- Report Inappropriate Content
I'm getting the same error as well. Anyone found a solution to this yet?
- Mark as New
- Bookmark
- Subscribe
- Mute
- Subscribe to RSS Feed
- Permalink
- Report Inappropriate Content
I managed to get the disks attached. My problem was that I had only ensured the 4 VMDKs mentioned were in the VMs directory. Once I added all the VMDKs from the archive, I was able to add the disks
- Mark as New
- Bookmark
- Subscribe
- Mute
- Subscribe to RSS Feed
- Permalink
- Report Inappropriate Content
Sorry, but I've downloaded several different 8.x versions of the simulator, and I can only see the following vmdk files:
DataONTAP.vmdk
DataONTAP-cf.vmdk
DataONTAP-cf-flat.vmdk
DataONTAP-s001 (through -s024).vmdk
I simply have never seen DataONTAP-var.vmdk, -sim.vmdk or -nvram.vmdk. Am I missing something?
If I try and load Any file other than dataONTAP.vmdk I get the same error message as shown above in yard's original response.
Most frustrating -- what am I missing here?
- Mark as New
- Bookmark
- Subscribe
- Mute
- Subscribe to RSS Feed
- Permalink
- Report Inappropriate Content
Hi Dean -
I just checked the simulator downloads. I used the 8.1.1 download from
some time ago. That download no longer appears to be present. So, the
actual mappings of VMDK's to IDE interfaces may now be different.
I suggest you exmaine the ".vmx" file, which is the machine definition file
for the VM Player software. Look for which vmdk files are
mapped to which IDE interfaces - that will tell you for the specific
release what would need to be setup in VirtualBox.
Bob
Bob Greenwald
Enterprise Storage | HSBC Technology & Services N.A.
26525 N. Riverwoods Dr, Mettawa, IL
T +1.847.739.9524
From: POWELLDEAN <[email protected]>
To: Robert C Greenwald/HBUS/HSBC@HSBC02
Date: 02/12/2013 12:47 PM
Subject: - Re: Simulate ONTAP 8.1.1 withVirtualBox
NetApp Online Community
Re: Simulate ONTAP 8.1.1 withVirtualBox
created by POWELLDEAN in Simulator - View the full discussion
Sorry, but I've downloaded several different 8.x versions of the
simulator, and I can only see the following vmdk files:
DataONTAP.vmdk
DataONTAP-cf.vmdk
DataONTAP-cf-flat.vmdk
DataONTAP-s001 (through -s024).vmdk
I simply have never seen DataONTAP-var.vmdk, -sim.vmdk or -nvram.vmdk. Am
I missing something?
If I try and load Any file other than dataONTAP.vmdk I get the same error
message as shown above in yard's original response.
Most frustrating -- what am I missing here?
Reply to this message by replying to this email -or- go to the message on
NetApp Community
Start a new discussion in Simulator by email or at NetApp Community
******************************************************************
This message originated from the Internet. Its originator may or
may not be who they claim to be and the information contained in
the message and any attachments may or may not be accurate.
- Mark as New
- Bookmark
- Subscribe
- Mute
- Subscribe to RSS Feed
- Permalink
- Report Inappropriate Content
Dean,
I just managed to get my cDOT 8.1.2 sim working on Virtualbox 4.2.10.
I first tried to use the VMWare ovftool 3.0 to convert the dataONTAP.vmx converted into an OVF format. Conversion works, but the import not.
When importing, the disk images seem corrupt, or keep complaining that
So I've used Bob's step by step plan (the first posting in this thread), combined my previous experience to convert/import version 8.0 into Virtualbox.
1. I downloaded the player/workstation version of the sim_8.1.2, and unzipped it into a folder.
2. I started the creation of a new VM, cDOT, FreBSD (64bit) with 1600MB and 2 CPUs
3. Do not create a hard disk,
4. but point to the existing vmdk disks:
DataONTAP.vmdk > connected to IDE primary master > normal, 1.03 GB
DataONTAP-var.vmdk > connected to IDE primary slave > normal, 1,51 GB
DataONTAP-nvram.vmdk > connected to IDE secundary master > normal 5,00 GB
DataONTAP-sim.vmdk (this is the disk that is split up into several parts, but you'll find a DataONTAP-sim.vmdk beneath all these S001 to S0xx.vmdks) > connected to IDE sec slave > normal, 250 GB)
5. it is crucial to add the floppy controller, AND add the empty floppy device 0, otherwise, the system will not find the correct boot device(s). And remove the cdrom device.
As of step 6, I followed all steps Bob used, and my vsim booted without problems.
I'm now able to use OC System Manager 2.x from within another W2K8 Virtual Machine and my Lenovo host laptop to configure it further.
I have not yet tried cDOT with 2 sims yet. To be continued !
Good luck !
Johan
- Mark as New
- Bookmark
- Subscribe
- Mute
- Subscribe to RSS Feed
- Permalink
- Report Inappropriate Content
Hello,
Thanks for this guide. Can you upload a guide to setup the cluster mode setup for on tap on the virtual box - I could do with you clarifying what network adaptors work best and how we get the 2nd node to join the cluster. Thanks
- Mark as New
- Bookmark
- Subscribe
- Mute
- Subscribe to RSS Feed
- Permalink
- Report Inappropriate Content
I followed the guide to the letter (the second time around) and got as far as step 17. Unfortunately the VM then goes into a reboot loop, but I neve rsee the "ctrl-c" menu to reinitialise the simulator.
Any suggestions ?
- Mark as New
- Bookmark
- Subscribe
- Mute
- Subscribe to RSS Feed
- Permalink
- Report Inappropriate Content
which data ontap image are you using, the ESX one or the fusion/player/etc image ? Or does it even matter ?
Thanks for the nice write-up,
Dan
- Mark as New
- Bookmark
- Subscribe
- Mute
- Subscribe to RSS Feed
- Permalink
- Report Inappropriate Content
I was using the Fusion/Player version. Can't confirm whether the ESX one
would make a difference, but I suspect that it should be close enough.
Bob Greenwald
Enterprise Storage | HSBC Technology & Services N.A.
26525 N. Riverwoods Dr, Mettawa, IL
T +1.847.739.9524
From: daniel_mack <[email protected]>
To: Robert C Greenwald/HBUS/HSBC@HSBC02
Date: 02/11/2013 03:17 PM
Subject: - Re: Simulate ONTAP 8.1.1 withVirtualBox
NetApp Online Community
Re: Simulate ONTAP 8.1.1 withVirtualBox
created by daniel_mack in Simulator - View the full discussion
which data ontap image are you using, the ESX one or the fusion/player/etc
image ? Or does it even matter ?
Thanks for the nice write-up,
Dan
Reply to this message by replying to this email -or- go to the message on
NetApp Community
Start a new discussion in Simulator by email or at NetApp Community
******************************************************************
This message originated from the Internet. Its originator may or
may not be who they claim to be and the information contained in
the message and any attachments may or may not be accurate.
- Mark as New
- Bookmark
- Subscribe
- Mute
- Subscribe to RSS Feed
- Permalink
- Report Inappropriate Content
Update on my very recent experience with setting up VSIM under VirtualBox. My simulator is homebult, from latest sources, can not point to the 'download' or image here, but reckon this can be applied in general:
1. Original Instructions from this thread should be followed to the letter (ethernet interfaces, disks and their order - while looking at the .) including the:
2. Setting up the floppy drive AND adding the empty floppy. This will ensure the simulator bootloader have its' disks enumerated correctly, even if it makes no use of the floppy whatsoever
3. If your simulator decides to wake up in serial console mode (mine did), this is what I did to get it back to proper console:
- Set up the serial pipe file (I did it all on Win7,x64)
- Consult VirtualBox help, Serial Port section and download the serial pipe proxy utility
- Connect to it using puTTY
- Somehow (I forgot how, under puTTy) get into VLOADER> (that is the 2nd or 3rd bootloader, just before the kernel is loaded) and
- >setenv console vidconsole
4. This will bring you back into VSIM, menus and all, under virtualbox console
5. From that point on, it just 'works' (so far)
- Mark as New
- Bookmark
- Subscribe
- Mute
- Subscribe to RSS Feed
- Permalink
- Report Inappropriate Content
Guys,
I'm using Clustered ONTAP 8.2 in my VirtualBox right now.
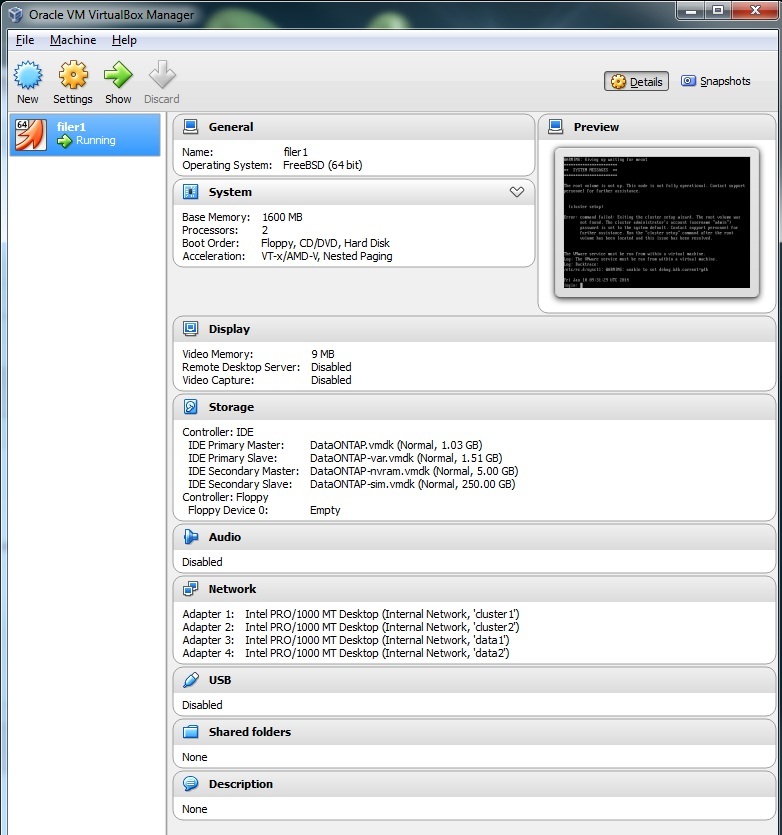
I just had a couple of problems to join a second node to the cluster. After looking for network problems I found that VSIM discovered the network cards as:
Adapter 1 = e0d
Adapter 2 = ea0
Adapter 3 = e0b
Adapter 4 = e0c
After setup the host-only networks properly (I have two: one for cluster interconnect and one for data) it works fine.
All the best,
Nascimento
NetApp - Enjoy it!
- Mark as New
- Bookmark
- Subscribe
- Mute
- Subscribe to RSS Feed
- Permalink
- Report Inappropriate Content
Hi,
I've been trying (unsuccessfully) to get the 8.2 cmode vsim running under virtualbox under WIndows 7 (64 bit) on both AMD and Intel.
I've followed the excellent instructions from this thread, and tried both versions (esx & vmware workstation). I'm confident the setup is as it should be:
The sim boots and runs, but never seems to initialise properly following option 4 on the boot menu, returning an error saying the rootvol is not up:
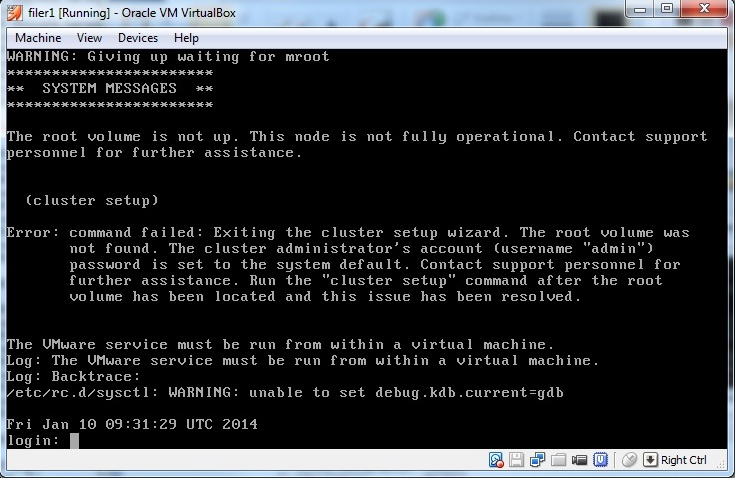
If run within VMWare player, eveything appears to run as it should and I am taken to the cluster setup.
Please ignore the error about VMWare tools - this is the only occasion when I haven't disabled them, and it makes no difference to the outcome.
Any clues as to what I might have done wrong gratefully accepted. If there's a way forward from this point, I'm happy to try.
I have managed to get the 8.1 vsim running to the point of cluster setup in virtualbox. I then mounted up the cfcard vmdx, unpacked 821RC1_q_software_image.tgz into .../image2, and booted into it at which point I got plenty of messages related to an upgrade, all of which seemed to indicate success, apart from when it was all finished. I eventually rebooted, chose option 4 (wipe) from the boot menu, and (eventually) ended up with the same error message re the rootvol. This seems to be related to not being able to untar the mroot into an appropirate destination...
Thanks
- Mark as New
- Bookmark
- Subscribe
- Mute
- Subscribe to RSS Feed
- Permalink
- Report Inappropriate Content
The only item I note off the bat is the network adapter types. My experience is that the Intel "Desktop" adaptors don't work, and that you need to use the specific "Server" type adapter listed above in this post (be sure to check which Server type, as VBox gives you two different types).
However, with all 8.x versions previous to 8.2, the only issue the network adapter caused was to not have networking available. Why that would affect the root volume I don't know, but on the surface that's all I have. Working on my own 8.2 c-mode sim (have 7-mode up already) - will post anything relevant to this as might be found.
Bob
- Mark as New
- Bookmark
- Subscribe
- Mute
- Subscribe to RSS Feed
- Permalink
- Report Inappropriate Content
Thanks Bob - although I haven't completed the cluster setup yet, I'd say you were spot on. I'd failed to pay sufficient notice to the network type which was desktop rather than server variant, having logged in to the systemshell it became obvious there were no adapters other than localhost, and under the hood of just logging in as admin there were various rpc failures which should have pointed me in this direction. As should the "allow system to boot without network adapters on AMD64" messages.
The desktop style adapters work with the 8.1.1 vsim image, but as far as I can tell no later ones.
Thanks for your help - much apreciated
Cheers
Julian
- Mark as New
- Bookmark
- Subscribe
- Mute
- Subscribe to RSS Feed
- Permalink
- Report Inappropriate Content
In my case NICs on Node 2 are setup correctly just like Node 1:
Feb 23 17:12:36 [localhost:snmp.link.up:info]: Interface 6 is up
Feb 23 17:12:36 [localhost:netif.linkUp:info]: Ethernet e0f: Link up.
Feb 23 17:12:36 [localhost:snmp.link.up:info]: Interface 5 is up
Feb 23 17:12:36 [localhost:netif.linkUp:info]: Ethernet e0e: Link up.
Feb 23 17:12:36 [localhost:snmp.link.up:info]: Interface 4 is up
Feb 23 17:12:36 [localhost:netif.linkUp:info]: Ethernet e0d: Link up.
Feb 23 17:12:36 [localhost:snmp.link.up:info]: Interface 3 is up
Feb 23 17:12:36 [localhost:netif.linkUp:info]: Ethernet e0c: Link up.
Feb 23 17:12:36 [localhost:snmp.link.up:info]: Interface 2 is up
Feb 23 17:12:36 [localhost:netif.linkUp:info]: Ethernet e0b: Link up.
Feb 23 17:12:36 [localhost:snmp.link.up:info]: Interface 1 is up
Feb 23 17:12:36 [localhost:netif.linkUp:info]: Ethernet e0a: Link up.
But still cannot join Node 2 to Cluster:
Do you want to create a new cluster or join an existing cluster? {create, join}:
join
System Defaults:
Private cluster network ports [e0a,e0b].
Cluster port MTU values will be set to 1500.
Cluster interface IP addresses will be automatically generated.
Do you want to use these defaults? {yes, no} [yes]:
It can take several minutes to create cluster interfaces...
Step 1 of 3: Join an Existing Cluster
You can type "back", "exit", or "help" at any question.
Enter the name of the cluster you would like to join [c1]: c1
Joining cluster c1
Network set up ................Error: Remote ping test failed. Verify that this node is cabled correctly and
that the cluster interfaces are using ports on the internal cluster network.
To verify, run the ping command from the CLI. For example,
"network ping -lif clus1 -lif-owner node-01 -destination <cluster ip from cluster>
-verbose true -show-detail true".
Restarting Cluster Setup
Would you have any clues or insight on how you have 2-Node Cluster using Simulator 8.2 with VirtualBox?
Thanks,
Hien
- Mark as New
- Bookmark
- Subscribe
- Mute
- Subscribe to RSS Feed
- Permalink
- Report Inappropriate Content
You can give a try on this!
Make sure your vyos router is up.
Make sure your node1 is turned up. You can check by pinging to this specific ip address for node1 as well as router.
Hope this should work.
- Mark as New
- Bookmark
- Subscribe
- Mute
- Subscribe to RSS Feed
- Permalink
- Report Inappropriate Content
Can anybody help me on this ?

After adding the floppy, it is complaining about the root image device.
How to overcome this ?
- Mark as New
- Bookmark
- Subscribe
- Mute
- Subscribe to RSS Feed
- Permalink
- Report Inappropriate Content
This instructions worked as stated. Nice job !
@bobshouseofcards wrote:There have been a small number of posts both here and in the support community about the change between the 7.3 family of OnTap simulators and those for 8.1.1. The delivery model changed from being one where you install the simulator on a Linux system (easily setup on any virtualization platform you have) to the model in 8.1.1 Simulator where you download a full virtual machine image designed for use in a VMWare environment only.
Many people will have access to one of the paid options (VMWare Workstation/Fusions/ESX) or can use the free VMWare Player on Windows. But, for those that need alternatives such as on a Linux or Solaris host platform or something free on a Mac, here are instructions to setup 8.1.1 Simulator on VirtualBox.
Disclaimer: to date I have only tested this on a single Windows platform. Specifically, I tested this on a 32 bit Windows 7 host (but on 64 bit capable hardware). Basic setup and general operations seem normally functional, though I have not delved into all the possibilities that OnTap offers. The 7-mode simulator is the one on which I did most checkouts since this is what I need to make available to other team members where I work. I have done minimal setup only on cluster mode. None of this is technically supported by NetApp, and your mileage may vary.
Test environment: Dell laptop, 3GB RAM running Windows 7 SP1 32 bit; VirtualBox 4.2.4r81684; Simulate OnTap 8.1.1. As per the VirtualBox documentation, you will need a 64 bit processor with virtualization enhancements enabled even if the host OS is 32 bit.
Setup (assumes basic familiarity with VirtualBox)
1. Download and install VirtualBox. I just used defaults for setup.
2. Download the 8.1.1 simulator. Extract the files somewhere that you want them to be.
3. Create a new Virtual Machine with OS type BSD, version FreeBSD (64 bit). Memory required is 1600MB. Don't select a virtual hard drive now, we need to select a bunch later. Save the new machine.
4. Open the Settings for the new VM. On the System page, Processor tab, set CPU to 2
5. On the Storage path, delete the CDROM from the IDE controller. Then, add 4 virtual hard disks to the controller. For each disk, you will choose an existing disk. The disks you will add, in order, are "DataONTAP.vmdk", "DataONTAP-var.vmdk", "DataONTAP-nvram.vmdk", and "DataONTAP-sim.vmdk". Finally, add a Floppy controller with a single, empty floppy drive. When complete, the storage setup for your new virtual machine should look like:
6. On the audio page, uncheck "Enable Audio".
7. On the network page, you can add up to 4 network adapters in any style that you choose - host only, bridged, internal, NAT. This provides a bit more choice than available through VMWare Player. Having some NICs of each type certainly can setup some interesting possibilities for multiple simulators. For each NIC you add, expand the "Advanced" section for the NIC and select "Intel PRO/1000 MT Server (82545EM)" as the adapter type. The Simulator virtual machine only has drivers for this emulated NIC type. A sample NIC setup would look like:
8. The default setup of the VMWare virtual machine attaches a local Windows pipe as a conduit to each of two serial ports - one for the "console" and one for debugging. You can enable serial ports and redirect, but it is not required.
9. On the USB page, uncheck "Enable USB Controller".
10. On the Shared Folders page, no shared folders need be created.
11. Save the virtual machine.
12. Be sure you have 1600MB real free memory to start the guest or it will fail during startup at some point.
13. Start the virtual machine.
14. During the 10 second countdown, click in the VM and press any key that is NOT Enter to stop the boot.
15. Update the environment to not start the VMWare tools with command "setenv bootarg.vm.run_vmtools false"
16. If you are installing a 2nd simulator this is a great time to update the serial number as per the documentation as well.
17. Enter command "boot" to continue with the startup of Data OnTAP.
18. When the "Press Cntrl-C for menu" appears, press Cntrl-C and wait for the boot menu. This first boot can take a little bit to happen depending on your hosting platform.
19. On the boot menu, select option 4 and confirm clearing all disks and deleting all data.
20. The Simulator will restart - let it proceed normally. After restoring a fresh Data OnTAP from the simulated media you will eventually get the prompts for standard setup of a new Filer.
Enjoy!
